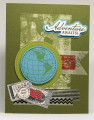
When I saw the sketch, my mind immediately turned to my Stampin' Up! (SU) "Beautiful World" and it's globe theme. So I started by creating the globe by stamping green onto a light blue cardstock. I die cut the globe and a green stitched circle mat using the SU "Stitched Shapes" dies. I mounted the globe using adhesive tape onto the green mat to add dimension to this focal point on the card.
Having established the main colors for the card, I then went looking for globe/map/travel themed papers and embellishments. I found an abstract green map pattern in the SU "World of Good" designer series paper (DSP). I die cut the rectangle using SU "Stitched Frames" dies. I really liked the dark green in the abstract pattern, so chose a dark green cardstock for the card base.
The sketch has SO MANY elements, I didn't want to get too carried away with colors, so chose black to stamp some vintage Hero Arts postage stamps and a cancellation mark (I believe I've had this set for 10 years!!). I stamped theme on white, but decided the contract was just too stark for a vintage theme, so use an E00 Copic marker to make the postage stamps "off white".
The final element of the card was the sentiment. I thought "Adventure Awaits You" in the SU "Beautiful World" set was perfect, so I stamped it in black ink onto white cardstock, then scanned it into my ScanNCut digital cutting machine and set it to have a 4" margin around the words, then cut it out. Without turning my cutting machine off, I placed a scrap of the same blue cardstock as the globe was stamped on, then set my machine to leave a 0.12" magin around the original sentiment and cut it out.
The order I assembled all the card elements is:
1. Glued the green abstract rectangle to the card base.
2. Placed the "flag" Washi tape to the right of where the globe was going to be place.
3. Glued down the matted globe.
4. Placed two strips of Washi tape below the globe (slightly overlapping).
5. Glued down the two vintage postage stamps.
6. Put adhesive tape on the cancellation mark and mounted it over the top of the two postage stamps.
7. Mounted the sentiment onto its blue mat using foam tape, and then glued it to the upper right so it would balance the card front which had foam backed elements already in the center and at the lower left.
I am rating the difficulty of this card as a "3" out of possible "5" because it required a lot of planning for such a complex sketch. None of the techniques were difficult, but it took an hour to make the card due to all the layers and steps. I think it will be a good card for a graduate, a friend who likes to travel, or for someone who is at a life milestone that needs celebrating!
Date: Tuesday, February 16, 2021 GMT Views: 584
Favorited:3
Additional Info
Stamps: SU Beautiful World, Travel Destination Postage Stamps
Paper: SU Old Olive, Mossy Meadow, Whisper, White, Marina Mist, World of Good DSP