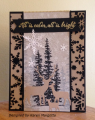
This is my 2020 Christmas card; it has dimension from the faux letterpress technique that does not show in the picture. The technique's 'how to' comes from Jennifer McGuire's tutorial found here:
What I did differently from Jennifer's instructions:
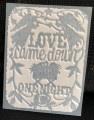
1) rather than adhering multiple die cut layers of CS, I die cut 2 pieces from a MANILLA FOLDER and adhered together (I figured that would hold up better through 80 card fronts ... and it did!).
2) If your die cut involves TEXT, adhere the vellum to the bottom/back side of your adhered stack of die cuts.
3) Rather than brayering ink onto the vellum, I ended up applying the inkpad directly to the vellum.
The rest was per Jennifer's clear instruction.
I did my 'letterpressing' onto Tim Holtz's watercolor paper before trimming any edges. Experiment and try both sides of this watercolor paper... the smooth side and textured side result in a subtly different look and feel.
I trimmed the letterpressed card fronts on Tim Holtz's deckle edge trimmer then came in with my deckle scissors to round the corners. I could have used scissors for all the trimming ... but I can't cut long straight lines by hand AND I didn't want blisters from all that cutting.
The white card base: I did direct-to-paper to color the perimeter of the card base's front before adhering the trimmed letter-pressed card front.
I had considered adding a touch of sparkle to the star but decided against it since this card has a somewhat rustic look and feel.
Date: Saturday, December 12, 2020 GMT Views: 263
Favorited:2
Registered: June 4, 2009 Location: Deatsville, Alabama Posts: 84029
Sat, Feb 20, 2021 @ 2:12 PM
Very cool technique and look! I really like the colors you went with too. Super pretty card!!!!
------------------------------ Nancy Williams - Hope your day is Spirit-filled and ink-filled (in that order)!DRS Designs-DT, Punchkateerforever, Dirty Dozen Alumni