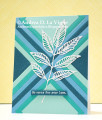
The inspiration for this card came from one I recently saw Nichol Spohr do. I loved the graphic look she got with the background, and how it was almost one layer, because of her use of die cut inlay.
I used 4 different shades of teal cardstock, all from my scrap stash. I picked out 4 square dies, skipping every other one so I would have about a 1/4" frame from each set. Nichol had die cut each square, then used the next smaller die for each to die cut it into a frame. I decided to halve the number of times I'd have to die cut, so taped both dies for each frame to the cardstock at once. I taped the largest die to my darkest cardstock, and nested the next smallest one inside it. I used my ruler to check the diagonally opposite corners, to make sure the dies lined up there and so were centered. I ran that through my die cutting machine, & repeated those steps to get 2 frames. I did the same process with 2 more shades of cardstock, then used the smallest die to cut 2 full squares from the lightest cardstock.
I drew lines on the front of my card base to mark the vertical & horizontal centers. I applied Stick It adhesive to the full front of my card base, rubbed it firmly with my bone folder, & removed the release paper. To help me line up the frames, I positioned my card base so the lines I'd drawn on it lined up with lines on my grid mat. I took one of the largest frames, & adhered it so one corner was at the center of my card front, & the diagonally opposite corner lined up with the corresponding line on my mat. After that, it was just a case of butting the next frames against the first to complete the top section. I trimmed off the overhanging cardstock, and moved on to the right side. I realized that, if I did the same pattern as the first section, the darkest teal on the side would be against the same shade on the top, basically making a (visually) wider frame. Not the look I wanted. So, I used the frame I'd cut from the next lighter shade for the first piece on the side, and cut more of the darkest shade with my smallest die to finish the pattern going that way. The bottom & left sides just mirror the top & right, respectively.
For the focal image, I chose a leaf cluster from the "Skeleton Leaves" die set. I die cut it from white cardstock. In hindsight, I should have applied Stick It to the cardstock before die cutting, to make adhering it easier. But, I was able to use liquid glue in a bottle with a needle-nose tip to apply tiny lines of glue to my die cut.
I heat embossed the greeting, from "Magnolia Sympathy," on a scrap of the darkest teal cardstock I'd used for the background. I cut that into a strip, then cut more dark teal strips to glue to the back to pop it up a bit. I glued that over the stem of the leaves, and that finished this card. I love how this came out, and will try more, maybe with other nesting shape dies!
Date: Saturday, September 5, 2020 GMT Views: 209
Favorited:2