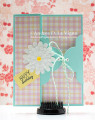
I actually had made this card base several weeks ago. I followed a tutorial at the Stamps to Die For blog to make it. I don't have the tag topper punch the tutorial writer used, so substituted the largest "Crescent Tag Toppers" die. That made the left panel too narrow for what I wanted to do then. But, rather than pitch a perfectly good card base, I held onto it, in my UFO (Unfinished Objects) pile. I finally decided to finish it a few days ago.
I cut & adhered 2 panels of the check patterned paper, one to the left flap & the other inside. That piece was actually from my scrap stash, and I still have a little left over for another project. I also punched 2 of each size of daisy (The Paper Studio brand punches) from white cardstock, and glued the layers together just in the center of each to create a fluffy layered flower.
I punched a hole in each of the "tag topper" flaps with my Crop-a-Dile II, and used the same tool to set a white eyelet in each hole. Then I glued the flower in place.
I stamped my greeting onto a scrap of yellow cardstock, and die cut it with a tag die. I tucked that under the flower petals. I added the flower center with Nuvo Crystal Drops, let that dry, and then threaded a length of twine through the eyelets to tie the card closed. I did add a bit of tacky glue to the ends of the twine, to keep them from fraying, so the recipient can easily rethread the eyelets if she so desires.
Date: Saturday, September 5, 2020 GMT Views: 264
Favorited:2
Accessories: Sunny Studio "Crescent Tag Toppers" die; Poppystamps "Pinpoint Main Street Tags" die; 3 sizes of daisy punches; Dandelion Yellow Nuvo Crystal Drops; white eyelets; Crop-a-Dile II; green & white baker's twine


 I also punched 2 of each size of daisy (The Paper Studio brand punches) from white cardstock, and glued the layers together just in the center of each to create a fluffy layered flower.