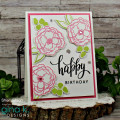
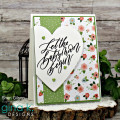
I created this card for a friend whose birthday is coming up soon. The inspiration came from this card I had saved on Pinterest. I like the way the you in that card is done with the 2-tier eclipse technique.
The inspiration card used a die cut oval for the main part. I wanted more of a one-layer-ish card, so I die cut a scalloped oval from the center of a piece of freezer paper that I'd cut to 5x6". I ironed that to my watercolor paper, that I'd cut to the same size, to use as a mask. This is a technique I learned in an Online Card Classes class a few years ago.
After I ironed on my mask, I stamped the rose with Versafine Onyx Black ink. I was glad I used my MISTI, since I had to stamp it a few times to get a good impression. I let the ink air dry for a couple of hours while I did other things. I didn't want to heat set it, because I was afraid that would release the freezer paper mask from my panel.
I first used a blending brush to add Tumbled Glass ink to the areas around the rose. I didn't worry if it went over the image here and there, since I knew the watercoloring would cover up any stray ink. After I finished inking, I watercolored the rose, using a photo I found online for reference. I used a dark green to add shadows to the red petals, then glazed over that with more of the red. It took maybe a couple of hours to paint it, but I love how it came out!
After the paint dried, I removed the mask (it just peeled right off), and die cut the "you" from the panel. I made sure to keep not only the word but also the inside pieces from the o & y. I trimmed my panel to 4x5-1/4", and adhered it to a green mat I'd mounted to a white card base. I used mostly ATG to adhere my panel, but added liquid glue around the cut-out word, just to make sure all the little bits stuck.
I die cut another you from white fun foam. I left the word in the negative space so it wouldn't get deformed (a tip I picked up from Laurie Willison), and glued the paper you on top. I removed the foam+paper die cut from the negative, & nudged the 2 layers to line them up. I let that dry under an acrylic block. After the glue dried, I used more glue to adhere the die cut into the negative space in my card front. I glued in the inner pieces of the letters, and put an acrylic block on top, again to hold it until the glue dried.
I didn't want to cover up my background, so I decided to stamp the rest of my greeting on a vellum strip. I don't have a "happy birthday to" stamp--not even with the you included--so I used "Claire's ABCs" to spell it out. I stamped it with Jet Black Archival ink, heat set it so it wouldn't smear, and cut the left end of the strip in a fishtail banner. I don't know if that made much difference, since it doesn't really show up on the finished card well, but whatever...! I ran the strip through my Xyron Sticker Maker, and adhered it to my card.
Date: Thursday, July 16, 2020 GMT Views: 154
Favorited:3
Registered: June 4, 2009 Location: Deatsville, Alabama Posts: 83609
Fri, Aug 14, 2020 @ 4:29 AM
Wow, Andrea, your card is fabulous. Such a cool hidden sentiment, fun colored flower, and super details. BEAUTIFUL!!!! Hugz
------------------------------ Nancy Williams - Hope your day is Spirit-filled and ink-filled (in that order)!DRS Designs-DT, Punchkateerforever, Dirty Dozen Alumni