I'm crazy proud that I finally found a solution for making these damn things! I am not one to toot my own horn, but I get the idea this is something that confounds a lot of craft organizers, so here goes. It's long.
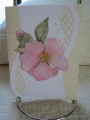
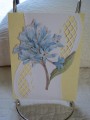
What I did was assemble this with normal cartonnage type techniques, which I have been gradually learning from Youtube videos. Painted the cardstock hinges and trim with a cream colored acrylic paint (been testing paint recently). Used 3 designs from my huge 360 page Susan Winget pad. Cut out paper that was just a smidge smaller than each side, and glued them on as panels. I could have used ahesive tape, but that would have ended up costing as much as the damn board did. That stuff is expensive. I used tape on the front panel only.
Took about 3 days to make this. 1 hour one evening after dinner just to cut the damn chipboard (on the kitchen counter, no less because it was the largest spot) which clearly showed that I need a hell of a better knife then I have. Or the worlds toughest guillotine paper cutter. Another day to assemble and paint, and then an afternoon to do paint touch-ups, cut the designer paper and glue it on.
Also used a Paper Trimmer, Scorboard, a bunch of different measuring devices including an antique yardstick (which resulted in bad cuts, but I really needed a LONG straight edge). I should buy a guillotine paper cutter, but at the end of the day, this is hard. A personal touch is required. The cleaner and straighter edge makes the better looking box.
(After 20 boxes, I have yet to make what I consider to be a top grade box. I don't mean the final design, just the box. I'm a little OCD. Sigh.
Date: Tuesday, June 30, 2020 GMT Views: 458
Favorited:2