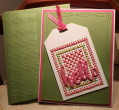
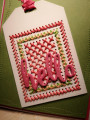
I received this beautiful floral image and die cut from my good friend Karen (aka Art Deco Diva). I just LOVE this flower! Beside being a good friend, Karen is fast becoming my #2 craft enabler -- get a ScorBuddy, buy a gelli plate, try this technique! LOL I just love the passion of crafters. So far I have resisted buying more supplies; but, I do have a brayer.
For the background, which was new to me, I smooshed DOs onto my glass mat, spritzed with water, then ran a brayer through the ink. Applied the brayer to my paper. I like how it thinned the ink out a bit. I got great coverage with just a couple brayer rubs. Dried and stenciled with one of the paisley stencils from the mini set. Colored the leaves with darker green Copics; colored the die cut with my darkest green Copic, lightly shaded the flower, adhered everything to the base and added a drop of Stickles for the finishing touch.
I really like the brayered affect on this card. I also brayered the ink on the glass mat and then smooshed my card directly to the ink. I liked that a lot too. The brayer may be my new best craft friend.
Hope you have some crafty fun with your best craft friend today. TFL.
EDITED: I forgot to mention, I just put a square of ink down. The brayering moves the ink out so you don't need a whole line of DO on the mat Also, I put both colors side-by-side at the same time. I don't know if that would work with every color combo, but it worked with these colors. My brayer is less than 4" otherwise I might have tried for three colors. I might have to buy a bigger brayer. Knew I would end up buying something. LOL.
Date: Friday, June 26, 2020 GMT Views: 431
Favorited:3
Registered: October 23, 2011 Location: Western, NY Posts: 7505
Fri, Jun 26, 2020 @ 10:10 PM
Gorgeous Bg...the stencil over top is perfection. Wonderful flower and clever the way you added the die cut headline cutting part of it off...a "cool" look.
Betty
Registered: June 10, 2011 Location: Canberra, Australia Posts: 7372
Fri, Jun 26, 2020 @ 11:27 PM
A special background - and a new way to create it too. Love the way the stencil softens the whole card. Now - that stamp - it has to go on my wish list. See you too can enable!
Splitcoast Dirty Dozen Alumni Proud Fan Club Member Splitcoast Challenge Hostess Teapot Tuesday TEAm
Registered: April 18, 2011 Location: Melbourne, Aus Posts: 51844
Fri, Jun 26, 2020 @ 11:55 PM
You did what???? Okie dokie, I'm back after reading your description eight times. Oh my gosh, are you blessed to know Karen in real life and thank you for convincing me $80 wasn't a monumental waste of money in buying a glass mat! I am in awe at how you did this with a glass mat and brayer. Helen is right, you are an enabler.
------------------------------ Susie
Please don't take your organs to heaven - heaven knows we need them here.
Registered: July 9, 2008 Location: Stars Fell on Alabama Posts: 74958
Sun, Jun 28, 2020 @ 2:39 PM
Beautiful!!! And, Karen is the sweetest person ever. You sure created a super card from her gift. Yes, we always are enabled to buy something new.
------------------------------ My Blog---My Gallery---My PinterestI'm a Punchkateer! (Prez) FOREVERDirty Dozen Alumni2014 CAS Spring DT--- Inspiration Challenge Co- Hostess 12/02/17-12/28/19 Watercolor Wednesday Design Team Hebrews 13:2Brenda
Registered: December 4, 2010 Location: Minnesota Posts: 16610
Sun, Jun 28, 2020 @ 6:16 PM
Wowsers Debbie! This is such a gorgeous card and a true work of art. The background is so gorgeous; especially with these colors and the gorgeous stenciling you did too. You took those die cut goodies and worked your magic with them in a most wonderful way my friend. I never ever would have thought to put distress oxide inks onto a glass mat and brayer them onto cardstock- that is brilliant! And the result is beautiful. I also love how you sopped up the leftover ink on the glass mat with more cardstock and can enjoy that too - fun! I have to admit, I laughed and laughed and laughed about all the inadvertent enabling I am doing Debbie. Too Funny! Hugs! ~Karen.