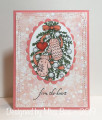
This is card #2 of 50 hand-stitched cards that I made over an 18-month period, giving 44 of the cards in a special set as a gift for my Mom, who is a master cross-stitcher, and she is extremely talented in other art forms, such as quilting and knitting, to name just a few of her many areas of artistic expertise. I had been actively looking to find a way to create cross-stitch or some form of hand-stitching for a few years, and had bought some stamps and dies to try and simulate that look, but when I watched a YouTube by Jennifer Mcguire where she introduced a metal die by Paper Smooches that when die-cut on cardstock, there was a way to cross-stitch or hand stitch on paper to create some very special cards. I have since used a larger die by Altenew, their Pegboard die to create a similar die-cut, but it's larger, and it works very well on a 5 by 7 card. This is an A2-sized card, thus I used the smaller die by Paper Smooches, which I used first, later I made the larger cards.
I decided to use each hand-stitched piece I created, from the very beginning, so these will vary in quality. With the exception of 2 cards which I will indicate which two, the other 48 consist of patterns with color combinations that I created myself. It is my desire to learn some more basic stitches that I can incorporate into new patterns in the future.
As Jennifer Mcguire states, I also have found Hand-stitching to be very relaxing, and an enjoyable activity when I am listening to music, watching a YouTube (usually on card-making), or watching a television program. These are not fast cards to make, but I enjoy the process, and I tend to only make them for people who will understand the amount of work that goes into making one, someone who will keep such a card...
As I mentioned previously, this Paper Smooches stitching die does not have an outer cutting edge, and in this case, I left a much wider frame around the stitched piece than I do normally. It helped me frame out the metal sentiment of thankful with that extra space. I used very heavyweight foil metal silver cardstock from Anna Griffin, which I love in the matte finish (the one used here), the mirror finish, and the glitter finish. I do find that the matte foil cardstock die-cut tends to photograph easier, because the matte foil cardstock doesn't have the same reflective quality one finds in both the mirror foil as well as the glitter cardstock. I LOVE using Anna Griffin's foil cardstock, and consider this brand plus the Crafter's Companion luxury cardstock packs, which give 10 sheets of each type of foil cardstock in each pack--matte foil, mirror foil, and glitter. I highly recommend both. If you are looking to buy one type of foil cardstock in a particular metal color like silver, gold, or rose gold, then I would recommend buying Anna Griffin brand, as a package of matte or mirror foil has 36 sheets of 12 by 12" plu 36 sheets of 5 by 7". I have been blessed to find the silver, gold, and rose gold matte foil on a clearance sale on our Canadian shopping channel, TSC. I have had to pay regular price for the silver mirror cardstock, but I tend to use the matte silver much more frequently, as I have used it here. The word, thankful looks like it was forged from metal, and I love that look!!!
Because the creamy white layer has a larger border in that creamy white, it left only room for a very thin layer of burgundy cardstock, and no embossing was possible on this layer. But I really like how this one turned out, and I think that the heavy look of matte silver metal really grounds this hand-stitched card.
I used Darice double-sided foam strips to add dimension between the hand-stitched layer and the burgundy cardstock. I used wet glue to adhere the metal sentiment to the hand-stitched pattern at its base. Now, I would heartily suggest using an extremely strong glue, like Gina K Designs Connect glue, but when I was putting these cards together, I had not tried that glue, but I have since used it on Bill's Hand-stitched 84th Birthday card to adhere the fun-foam sentiment in addition to the double-sided adhesive that was attached to the fun-foam before I die-cut the words happy and birthday.
Because I was making most of these hand-stitched cards as a gift for my Mom to give or to send to her friends or family members, I chose to leave the inside of each card blank, so that my Mom could personalize her own message, and to make sure that the card was suitable for a much wider group of people than it would if I put in a message myself.
With the A2-sized hand-stitched cards, I often substituted cored envelopes, often metallic ones by Simon Says Stamp or colored ones by Gina K Designs. In this case, I used an envelope in a light pink that I embossed the rectangular flap with Cuttlebug Kitchen Weave embossing folder.
Thank you so much for stopping by to take a look at my hand-stitched card, this is #2 of 50. When you take the time and the effort to leave a comment for me, know that you absolutely make my week, I get so excited to see a comment!
Please stay well and safe during this very difficult and very unusual time.
Date: Sunday, June 21, 2020 GMT Views: 928
Favorited:2
Paper: Anna Griffin matte foil silver cardstock, 110 pound white cardstock, Scrapbooking Made Simple Simply Defined Distinctions A2 heavyweight card bases and envelopes set
Registered: May 18, 2008 Location: Virginia Posts: 24623
Wed, Jun 24, 2020 @ 7:36 AM
Gosh, these colors are so pretty together. I can see where it would take you some time to make these delicately stitched cards. Anyone who received them will really appreciate the time it took to make this card. The stitching is so precise. I could never do it that good. Keep 'em coming as I truly enjoy looking at them.
------------------------------ Pam Co-Founder of The Punchkateerz! Fan Club Member FS149, QFTD44