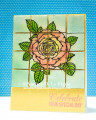
I stamped the rose onto a 4" square of watercolor paper with Versafine Onyx Black ink, & clear heat embossed it. I actually could have just stamped it without the heat embossing, since I needed to add more embossing over it for the tile technique, but didn't think of that. I also initially planned to watercolor, so I figured heat embossed lines would make that easier.
Instead of watercoloring, I decided to ink blend the image with my Distress inks & makeup blending brushes. I used the tiniest brushes for the flower & leaves, and a slightly larger brush for the background. The color application is not as precise as watercolor would have been, but I'm still happy with it.
After I finished ink blending, I cut the panel into 1" squares with my paper trimmer. As I cut, I placed the squares in order off to the side. After I'd finished that, I flipped the squares over--still in order--and numbered the back of each so I could get them in place easily when I adhered them to the card. I went around the edges of each square with a black marker. I coated the squares with Versamark, and added clear embossing powder. I repeated the heat embossing step 2 more times to get a smooth, glossy finish. I added foam tape to the back of each square, being very careful again to keep them in order, since I was covering the numbers I'd written with the tape. Finally, I adhered them all to a yellow panel, leaving a bit of space all around each square. I stamped my greeting on the panel with Worn Lipstick Distress Oxide ink, to tie into the rose color. Finally, I adhered my card front to a white card base.
Date: Tuesday, March 31, 2020 GMT Views: 198
Favorited:4