The Ways To Use It Challenge, WT784 - Tear it Up - (3/19/20), was to use a torn edge somewhere on your card or project.
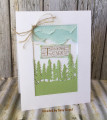
I had this card base with stitched rectangle aperture left over from another project. The SU Stitched Rectangle framelits have 2 rows of stitched detail, one row of stitching will appear on the inside cut and one row of stitching will be left on the outside edge. This outside edge is too good to waste, so when I use them for a project I try to plan to have really nice leftovers when I use one of the dies. That's how I ended up with this lovely starting piece for the base of the card.
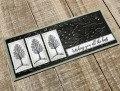
The die cut border of pines was a sample cut from a new die that I got, and it just happened to fit in the opening in the card front. It looked kind of plain Jane, so I dry embossed it a couple of times with SU Subtle EF to give it some texture.
The sky was created by tearing a strip of Soft Sky CS, sponging the edges with white pigment ink and stacking them together before tucking them at the top of the opening.
I originally stamped a greeting on the inside of the card that was visible between the lower edge of the clouds and the tops of the trees. It looked really cool when the card was laying flat, but when the card was upright, the sentiment looked off kilter for spacing...
and it was then that I realized that when I wrote in the card, the persons name would have to be WAY at the top and anything I wrote would have to be squeezed in a small space at the bottom! Ack!!!!!
Plan B to fix this little design issue was add a white panel on the back side of front flap. I used narrow strips of thin foam tape to add a bit of separation between the decorated front and the panel. I was worried I would muck up when I stamped the sentiment, so I opted to stamp the sentiment on a separate piece, cut it and add it to appear like a wood sign.
To finish, I made a knot of several strands of linen thread, clipped the ends and curled with a bone folder.
Fun challenge, to rip and tear, and also fun to figure out how to rescue a not-so-well-planned design!
Thanks for stopping by and looking at my Rustic Forest Torn Sky card!
Date: Thursday, March 19, 2020 GMT Views: 1616
Favorited:6
Registered: March 8, 2005 Location: Halfway between Dallas and Houston Posts: 24020
Thu, Mar 19, 2020 @ 8:09 PM
This is really lovely, Susy! I love the simplicity of just the torn paper and the die cuts. The tearing is done so it completely looks like clouds in the sky! Great card.
------------------------------ Proud Fan Club Member
Dirty Dozen Alumni
"Art washes away from the soul the dust of everyday life."
Splitcoast Dirty Dozen Alumni SCS Gallery Moderator Splitcoast Challenge Hostess Teapot Tuesday TEAm
Registered: July 27, 2007 Location: Dublin, Ireland Posts: 132004
Sat, Mar 21, 2020 @ 12:59 AM
How lovely, a wonderful outdoor scene. Using the torn edges for the sky is inspired, I would more normally use them for grass or snow. It gives an amazing slightly cloudy effect. The linen thread looks fab.
I know exactly what you mean about the inside looking off kilter originally when you could see through the aperture. Great workaround.