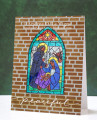
I don't have black embossing powder, so I had to come up with a workaround for the embossing on the acetate. I stamped the image first with StazOn, using my MISTI. Then I restamped with Versamark, & used clear embossing powder. The stamping with the StazOn wasn't totally perfect, despite my double-stamping that, but it still works OK.
I colored the image on the back of the acetate with Sharpie markers. Since I had a limited (24 marker) color palette, it was kind of tough, but I think it came out fine in the end.
To add the foil, instead of adding the adhesive sheet to the foil as Frenchie did, I added it to the back of the acetate. (I got that tip from a commenter on the video.) Then I crinkled my foil, opened it out, and flattened it with my bone folder. I adhered it to the back of my acetate. I love the way this piece came out, and the foil masks the streaks from the marker coloring quite well!
I used Brushed Corduroy & Vintage Photo Distress inks to stencil a piece of grey cardstock. After I made sure the ink was dry, I stamped my greeting & heat embossed that in white. I used a trick I saw Kristina Werner do in a recent video to help the greeting stand out a bit more. I used a small makeup blending brush and the Brushed Corduroy ink to go over the greeting. In hindsight, I wish I had used Hickory Smoke or Pumice Stone ink, but it still came out OK imo. Finally, I used double-sided tape to adhere my window, and mounted the panel on a white card base.
Date: Sunday, November 10, 2019 GMT Views: 1074
Favorited:4
Splitcoast Dirty Dozen Creative Crew SU Design Team Alumni
Registered: January 7, 2007 Location: Southern California Posts: 42740
Mon, Nov 11, 2019 @ 11:56 AM
This is really beautiful. Thanks for sharing the details about how you worked things out with your markers and how you put it together. Sometimes we don't have all the specific elements, so this helps me figure that out so I can give this a try.
------------------------------ Kathy Stamp n Sip with me