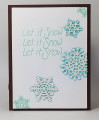
Since I knew out the outset it had to be a Christmas card for the one challenge, my mind instantly went to snowflakes rather than flowers shown in the sketch challenge.
I had recently seen a new technique on Jennifer McGuire's blog she called "Reverse Die Impressions". She features an excellent video tutorial at:
Basically, you use a rubber impressions pad and turn your dies wrong side up to make their outline impression using a die cutting machine into your card panel. Then you color (or not) in the impressed area (I used Copic Marker B01)and then die cut out the snowflakes using the same die, but with the cutting edges facing the paper this time. I cut three copies of each snowflake, then glued all three copies together to give depth and dimension to each snowflake.
I then coated the top of each snowflake with Versamark ink, and sprinkled Ranger Polysparkle embossing powder on each, then heat set to make the snowflakes shiny and sparkly to make them stand out from the white front card panel. Each snowflake stack was then glued into the impression made using the back of the die - so it fit perfectly!
I stamped a couple extra snowflakes from the matching stamp set to the top and bottom corners using Stampin' Up! (SU) Pool Party blue ink.
Finally, I dug really deep into my stash and found a VERY old set of holiday stamps mounted on black rubber foam blocks that had the perfect sentiment. I stamped this using the same ink color as the stamped snowflakes.
The front panel was mounted on an SU Chocolate Chip card base to complete the sketch and color challenges.
I'm rating the difficulty of this card as a "2" out of a possible "5". It's quick and easy. If you have a fine glitter cardstock, you might consider die cutting the topmost snowflake from it and not have to fuss with heat embossing.
Date: Monday, October 14, 2019 GMT Views: 682
Favorited:2