This card was made as a holiday card to be sent to someone special this coming Christmas (because it took me 4 hours to make it!). Admittedly, most of my time was spent fussing with the greeting, rather than the rest of the card.
The card was inspired by two challenges going on this week:
Retro Rubber Challenge Blog #121 which was a tic-tac-toe. I chose the diagonal starting in the bottom left corner up to the upper right corner (die cut or punch, embossing folder, floral).
- and -
Always Fun Challenge #131 which required dies or punches.
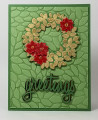
The main panel background was embossed using Stampin' Up! (SU) "Petal Burst" embossing folder to which I had lightly applied SU Garden Green ink to the front inside of the folder to accentuate the petals when they were embossed on the lighter SU Wild Wasabi cardstock.
The wreath was stamped using Versamark ink with the two-step SU "Wonderous Wreath" photopolymer stamps. The first one was stamped, then dusted with Recollections "Detail Gold" embossing powder, then heat set. The second stamping has fewer leaves, but they stamp atop the already embossed leaves. Again, I used Versamark, but for this layer I used super shiny and fine Recollections "Tinsel" embossing powder. This gives the wreath a two-tone gold appearance.
The poinsettias were stamped onto SU Real Red cardstock using Versamark, then dusted with clear embossing powder and heat set. I wanted 4 flowers, so stamped, embossed, and die cut 8 flowers. I used glue dots rolled into a ball to layer two die cuts for each flower, being careful to offset the top layer from the bottom. I then used Recollections gold liquid glitter in the center of each top flower. This had to dry for quite some time, so I set them aside, and went on the work on the sentiment.
The "greetings" sentiment was die cut using a Sizzix Tim Holtz "Seasons Greetings" thinlits die. I first die cut the greeting twice using SU Garden Green cardstock. Then ran one of the words through my Brother ScanNCut to scan it, and add a small border around the inside and outside of the word. I then cut this enlarged word on my SnC to use as a mat behind the green word using Bazzill Gold Mylar. This is nice and thin, and cut super well. The two green words were glued atop one another for added depth, then glued to the gold mylar mat. I experimented with several different approaches to creating the sentiment until I used the mylar on my fourth attempt.
All that was left was the final assembly. I used two circle dies to cut a ring of craft foam to glue to the back of the wreath to raise it up off the card's surface. The four poinsettia's were attached to the wreath using glue dots. The sentiment was backed with teeny tiny pieces of adhesive foam tape to raise it up to the same level as the wreath, and then attached to the bottom of the card.
I am rating the difficulty level of this card as a "3" out of a possible "5". There is nothing particularly difficult, but it is time consuming. If you are lucky enough to have some of the die sets that include both the sentiment and the larger mat dies, it would make this a lot easier.
I definitely met all the requirements of the two card challenges twice or even three times over! But I really like the results despite all the steps required.
Date: Friday, October 11, 2019 GMT Views: 522
Favorited:2