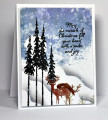
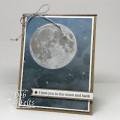
I made the sky with my cling wrap technique I use quite often. I just wipe the ink on the cling wrap, mist with water, wad it up, unwad, and dip it onto my watercolor paper where I need it.
I made a mask for the moon with frog tape over a piece of cardstock so I could punch it out. Then, I removed it from the cardstock and placed it on the paper before making my sky.
I cut a curved piece of cardstock for the snowbanks and sponged over the edges. I love seeing that work its magic.
The next thing was to stamp my tall trees with black ink. I also stamped the tops of some leafless pines at the bottom of the hill.
The deer were cut with an Impression Obsession die cut.
Last, I used my white paint and a toothbrush to make falling snow.
Date: Friday, October 4, 2019 GMT Views: 3753
Favorited:26
Stamps: Tim Holtz/Tall Pines, Stampendous/'Tis the Season, Stampscapes/Leafless Pine (small)
Paper: PTI white cardstock, Fabriano hot press w/c paper
Paper Size: A2
Ink: Distress Oxide Stormy Sky and Chipped Sapphire, Memento Tuxedo Black
Accessories: Frog Tape, make up brushes, Dr. Ph. Martin's Bleed Proof White, Impression Obsession die cut (deer), 1 1/4 " EK Success circle punch (for masking moon)
Splitcoast Dirty Dozen Alumni Proud Fan Club Member Splitcoast Challenge Hostess Teapot Tuesday TEAm
Registered: April 18, 2011 Location: Melbourne, Aus Posts: 51844
Fri, Oct 04, 2019 @ 10:50 PM
Oh my goodness BBBrenda this is jaw dropping stunning. The snow banks look real (actually I've never seen snow banks, but this is just how they look in the movies). Thank you for the description, I loved reading all the steps. I just scrolled back for another long look...STUNNING!!!!
------------------------------ Susie
Please don't take your organs to heaven - heaven knows we need them here.