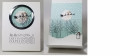
This tri-fold pop-up holiday card was inspired by Jennifer McQuire's card at https://www.jennifermcguireink.com/2...-up-cards.html. I adapted it for my own holiday stamps, and sandwiched a piece of stamped clear acetate for added dimension.
I created it for 52 Christmas Card Throwdown #36-19 which challenged us to create an easel or tri-fold card. The one I created is BOTH!
Jennifer's video tutorial is EXCELLENT, so I am not going to repeat her instructions here. Please refer to the materials list below.
The trees from the Stampin' Up! (SU) "White Christmas" set were stamped onto a 5-1/2"x 4-1/4" piece of snowfall pattern from the retired 2014 SU "All is Calm" Designer Series Paper. using Versafine Onyx Black ink. I then cut a 3-1/2"x 4-1/4" piece of acetate from scrap packaging, and stamped the trees onto it using StazOn Jet Black ink. After it dried, I flipped it over so when looking at the trees you were seeing the back side. This allowed me to place the acetate trees inside the card to fill in the empty spaces left by the three trees stamped on the snowy background.
The snowy hillside was cut using Lawn Fawn's "Stitched Hillside Borders" die. I attached the acetate to the back of the hills using Scor-Tape, then attached the "shoebox" folding mechanism Jennifer describes to the back of the acetate/hillside element.
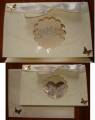
The circle cutout on the front of the card was done using a Spellbinder's circle die. Once you closed the card, that helped you determine where you wanted to place your moon and sleigh. Opening up the card again, I stamped the sleigh (from SU "White Christmas") directly on the snowy background using my SU stamp positioner. LEAVE YOUR CARD IN YOUR STAMP POSTIONER UNTIL YOU GLUE YOUR MOON INSIDE!
I created the moon by using a direct to paper method Jennifer McGuire often uses. It's simply pressing an ink pad (I used SU Crumb Cake, then SU Early Espresso) onto a silicone craft mat, then spritzing with water. Using a scrap piece of white cardstock, I swirled it thru the tan wet ink, being careful not to make it too dark, and not to cover the entire paper. Then I cleaned the mat, and did the same thing with the dark brown ink. Use even a lighter hand with the dark ink since you want it for lunar features, not the lunar background.
After the paper had dried (you can use a heat gun to speed up the process), I used a small circle die and move it around over the piece until I found an area that looked most like the moon, and die cut it out.
I then glued the moon over the top of the stamped sleigh, and keeping the card still in my SU stamp positioner, I stamped the sleigh once again using the Versafine black ink. I had to stamp it twice since the stamp is raised off the background surface it bit, so doesn't make it quite as black as the part over the moon.
The next-to-last step was to stamp and cut out my little snowman using my ScanNCut digital cutting machine. I wanted him to stand up off the surface a bit, so I cut two additional snowman outlines, and glued them to the back of the snowman. I colored his hat and scarf with SU markers.
The final step was to cut out a silver circle frame for the front of the card, and to stamp the sentiment with Versmark and apply silver embossing powder, then heat set.
This card is a bit involve (took me about two hours), so I am rating its difficulty level as a "5" out of a possible "5". It's important to make precise cuts and folds, or else your card doesn't match up or stand.
This one will definitely go to a special relative this Christmas!!!
Date: Friday, October 4, 2019 GMT Views: 1423
Favorited:3