I wanted to make a special card for an "Internet" friend. I found this tutorial at Mixed Up Craft for a simple shutter card, so I thought that would be perfect. (You can see the inside of my card at this post.)
I stamped the cat onto vellum bristol paper with Fadeout ink, and colored it with my Prismacolor pencils, to look like our cat Barney. Because, why not? I die cut that with a circle die, & die cut a scallop circle to mat it. I decided that a lolling cat didn't say "birthday" quite enough, so I stamped the present from "Birthday Before 'n Afters" on vellum bristol, colored it, and fussy cut it out. I used a couple of colored pencils to give a floor for the cat, and glued the present in front of him.
For the greeting, I stamped the "happy" & "birthday" from "Birthday Before 'n Afters." I did them one at a time, so I could snug them up closer. I stamped the thought bubble from "A Birdie Told Me" around that, and die cut it with the coordinating die. I glued that to my circle, & used a black felt-tip pen to draw the circles leading from the cat up to the thought bubble.
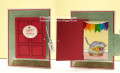
I created a 5x7" gatefold card base. I cut panels from the "Wedding Collection: Hugs & Kisses" paper to be "wallpaper." (I've actually had this paper for YEARS, and have yet to use it all up!) I adhered them to the front of the card base. I cut 2 pieces of white cardstock for the baseboard/floor. I taped off a band on the top portion, and inked the bottom with Tattered Rose and a makeup blending brush. I moved my tape, and inked the "baseboard" with Tea Dye. Finally I adhered those to my card base.
I cut a strip of the same patterned paper I'd used for my "wallpaper" for the belly band. I used the opposite side, overlapped & adhered the ends, and then adhered my circle to the front of it, covering the seam.
Date: Thursday, August 29, 2019 GMT Views: 585
Favorited:4


 I die cut that with a circle die, & die cut a scallop circle to mat it. I decided that a lolling cat didn't say "birthday" quite enough, so I stamped the present from "Birthday Before 'n Afters" on vellum bristol, colored it, and fussy cut it out. I used a couple of colored pencils to give a floor for the cat, and glued the present in front of him.