A good friend of ours is having a birthday soon. I made him this card, following a tutorial for an "Invisible Impossible Card" by Sam at Mixed Up Craft.
I created the card base from acetate, following a template I'd made previously from Sam's tutorial. (The acetate is what makes it an "invisible" impossible card, and makes it sturdier for the long haul to boot.) After I cut, scored, & folded the base, I cut my mats from Caribbean Breeze cardstock. I also cut the patterned paper pieces for the base, from the "Party Boy" pad. I was thankful I had more than 1 sheet of that pattern, though, because I cut one upside-down! Something to note, with an impossible card, is that if you have a directional pattern, you have to make the base pieces mirror images of each other. Thankfully, how you cut the other pieces for the pop-up don't matter, as long as you get the sizes right!
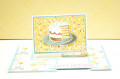
For the focal image, I used the cut-into cake from "Birthday Before 'n Afters." I stamped it with Desert Sand ink onto a scrap of vellum bristol paper, & colored it with my Prismacolor pencils. Finally, I die cut it with the coordinating die. I decided I needed something to "ground" my image, since it kind of got lost on the busy background pattern I'd chosen. So I used the 2 smallest WRMK "Oval" dies to make a plate. I die cut the larger from a scrap of silver mirror cardstock, then used the smallest die in the set to emboss the center. Very convincing, if I do say so myself! Then I used double-sided tape to adhere the cake to the plate. I popped both up on foam tape on my background.
I adhered all the cardstock & patterned paper pieces to my acetate base with a combination of double-sided tape and ATG adhesive. I cut 2 more pieces from white cardstock to the same shape & dimensions as the teal pieces on the base, to adhere to the bottom so my adhesive wouldn't show through the acetate.
For the main greeting, I stamped my sentiment (from "Big Birthday Sentiments") in Ruby Red ink on the back panel. That ink has a sparkle to it, which I figured worked well with a birthday card. I also used Ruby Red ink to stamp the main greeting on a strip for the base of the card. You can see that at this post. This card was pretty easy to put together, aside from the hiccup with the patterned paper being upside-down on the bottom the first time around.
Date: Saturday, July 27, 2019 GMT Views: 327
Favorited:2