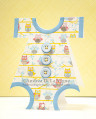
A friend of my mom's is having a baby boy in a few weeks. I made this card both for this "Rock a bye baby" challenge and for her to give to the new mother.
I followed this tutorial I had found via Pinterest. The tutorial author mentioned to make the card out of heavyweight cardstock & stamp or stencil a pattern on the front, if desired. I found the patterned paper with owls in the "Paddywack" set, and thought it would be perfect! (I admittedly have a love affair with owls.) So I took a white card base, applied ATG adhesive all over the front, & adhered my paper, which I'd cut to 4.25x5.5". That way, no matter where I die cut, the patterned paper would remain stuck to the card base.
Since I didn't have a large enough circle punch, I used dies. I die cut the neck hole & leg holes first, then used that die plus one 2 sizes larger to cut rings for the trim from blue cardstock.
After I cut the arms & sides, I glued my blue trim rings around the neck & leg holes. I trimmed out two 1/4" wide strips from one of the scrap inside circles (left over from cutting the rings) for the trim on the ends of the arms. I punched three 5/8" circles from the remaining 2 scrap circles to adhere behind the buttons. When the glue had set up on the trim pieces, I cut the excess off with scissors.
I threaded 3 buttons with yellow embroidery floss, trimmed the ends short, and stuck each button onto a glue dot. That secured the floss ends, and allowed me to adhere it to my blue circles. I did squirt a little glue on the top of the buttons over the floss, just for added insurance. I also used liquid glue to stick them to the onesie. Then I ran into a bit of difficulty.
I had not thought ahead to what I wanted to do for "fasteners" along the crotch line of the onesie. I tried cutting the prongs off 3 mini brads so I could glue the heads on to my card, but that ended up not working. I didn't want brad prongs showing on the inside of the card (I'm just picky that way), but the patterned paper was well stuck to the card base. So I got my Un-Du adhesive remover, squirted a little along the bottom edge of the card, & oh-so-carefully peeled the patterned paper layer back. I put a small self-healing mat between the paper & card base, & pierced 3 holes through the patterned paper. I inserted a mini brad through each hole, & spread the prongs. I did have to trim one prong on the middle brad with my wire snips, but that was no big deal. Then I squirted a little liquid glue between the layers, just for added hold "insurance," and held them together until the glue set up. Whew! I really love how this card came out, and hopefully my mom's friend will, too!
Date: Wednesday, July 10, 2019 GMT Views: 623
Favorited:4
Registered: January 20, 2016 Location: Freetown, Massachusetts Posts: 31442
Thu, Jul 18, 2019 @ 3:38 AM
I can hardly stand the cuteness! Love that owl DP for this sweet onesie. I also love the three buttons. Fabulous baby card, Andrea! Your friend will love it!
Registered: July 4, 2014 Location: Modesto, CA Posts: 5909
Sun, Jul 21, 2019 @ 4:49 PM
Lots of love and effort went into this very original onesie card. I am sure it will be cherished. Thanks for participating in my challenge.
------------------------------ Visit the Sketch Challenge on Wednesdays! Take the DOUBLE DARE on the 2nd Wednesday of the month with a fun fold & sketch.