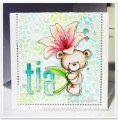
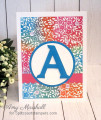
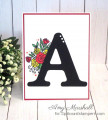
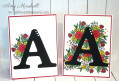
I did two cards for the Misti Monday Monogram Challenge! You can only see one here, because I was trying to show the different ways I used my Misit! I stamped the front of my cards, the inside of my cards-(the only part not shown above), the backside of my cards, & envelopes! I chose to die cut my monograms & decided to use both the positive & the negative parts of the die.( You can see the other card on my blog.)
I placed my card in my Mini Misti & placed the die cut letters for placement, then remembered I had a wonderful boarder for this! So I pulled it out & placed it in my Mini Misti on the card. Closed the lid, inked up my stamp & closed the lid to stamp. I stamped it a couple times to get the right color coverage. Something I was NEVER able to do with other stamp positioning tools. I wasn't sure if I had enough border & added the outer boarder next. Doing the same as above. I was happy! I adhered the monogram. I placed my second card in my Mini Misti. Because I didn't remove my stamp I was able to stamp my second card with ease, saving time & energy! (Believe me, I need all the help I can get! LOL) I placed the negative part of the monogram on my card, & saw I needed to trim it down, so I did, so it would fit nicely inside the boarder.
Next up, I stamped the inside of my cards: I used my Regular/Original Size Misti, as my card would fit nicely inside without crunching my card in any way. Sometimes, you just need the larger size Misti! ;) I lined up my stamps as best I could, & closed the door on my Misti. I rechecked my alignment on the door of my Misti with the grid there which helps TREMENDOUSLY! I stamped as above. I slipped the second card in & stamped away. Next, I added the little flowers & do-dad's on the sides of the scallop under the sentiment. It took less time, because I could leave the stamp in & do the second card after the first.
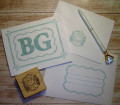
Back to my Mini-Misti, I then decided to stamp the back of my cards with my custom stamp. I had my custom stamp done in cling JUST SO I could use it in either of my Misti's! I DO LOVE the fact that I can re-stamp if necessary to get a good image! Since the stamp has black foam on the back of the red rubber, I keep a scrap piece of copy paper to check my alignment before doing my final stamping on the back of my card. Once I get it aligned perfectly with just a little move to the right or left, I stamp the back of my card! I've heard, some people like to leave their custom stamps in their Mini-Misti's so they don't have to realign the stamp every time. But, sometimes my desk gets a little crowded & I NEED my Mini-Misti & want to use it for more than my Custom Stamp! I LOVE the little handy size! ;)
Lastly, I KNEW I could use my Regular Misti one more time! I made Envelopes with my WRMK-Envelope Board. Placing them in my Misti, I aligned my stamps. Stamped them both & decided to add blue lines, just because they're pretty. I placed the stamp on the envelope, closed the door of my Misti, opened the door, inked up the stamp, & closed the door to stamp again! I also added those lines where the return address is, but didn't need the lines to be as long, so I placed a small piece of paper to mask off where I didn't want those lines. PERFECT!
Registered: June 4, 2009 Location: Deatsville, Alabama Posts: 84017
Fri, Apr 19, 2019 @ 5:51 PM
Super elegant! Wonderful stamping!!! Hugz
------------------------------ Nancy Williams - Hope your day is Spirit-filled and ink-filled (in that order)!DRS Designs-DT, Punchkateerforever, Dirty Dozen Alumni
Registered: July 4, 2014 Location: Modesto, CA Posts: 5909
Tue, Apr 30, 2019 @ 8:09 AM
Very lovely. Congrats on your win.
------------------------------ Visit the Sketch Challenge on Wednesdays! Take the DOUBLE DARE on the 2nd Wednesday of the month with a fun fold & sketch.