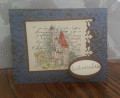
A friend of mine, who was also my high school art teacher, has a birthday next week. So I made her this card. I used a tutorial I'd found through Pinterest, modifying the measurements so I had 4 steps rather than the 5 in the sample card. This card--following the overall measurements in the tutorial--folds to A2 size, so I didn't have to change a lot to make it fit in a standard envelope.
I made a pattern with copy paper first, just to make sure I got the measurements right for the steps, since I modified the design. I also cut my card base to 5-1/2" high, rather than the 5" in the sample card. I divided that measurement by 4, and came up with 1-3/8" for the height of each step. Thank heavens it worked out that easily! To measure for the cut lines, I began with the top step using the measurements in the instructions, and just calculated my way down from there. I did the same for the vertical score lines.
I used my paper pattern to measure & cut my front panel from vellum bristol. I stamped the gladiolus on the panel with Fadeout ink, and colored it with my Prismacolor colored pencils. I had done a search on Pinterest for gladiolus flowers, and found this yellow & orange one, which I used to guide my coloring. At first, I was going to use Gamsol and a paper blending stump with my colors, but ended up deciding it wasn't necessary. After I'd finished coloring, I stamped my greeting with Morning Mist ink.
I cut my card base from Whirlypop cardstock; and marked, cut, & scored the lines for the steps. When I put my front panel on, just to test fit, I discovered I'd somehow messed up the measurements for it. Thankfully, I just had to trim off 1/8" from the left side & the right sides of each step section. Whew!
I decided just to cut a piece of patterned paper for the inside of the card, rather than decorate with images or whatnot. This time, since I had cut my card base, I used that for guiding my measurements on my patterned paper panel, cutting the panel slightly smaller so there was a 1/8" border all around it. I used liquid glue to adhere both that panel & my front panel, so I had a little wiggle room to get them positioned exactly.
For the "wish," I die cut the letters from a scrap of green paper with a slight pattern on it. I backed the paper with Stick It adhesive first, then die cut & embossed the letters. (Like all Spellbinders dies, these also emboss if you so desire.) I cut small squares of bristol, and glued them on the steps to mat the letters. Finally I adhered each letter in place. While I usually use a Teflon bone folder to press down die cuts I've backed with Stick It, I didn't want to mash down the embossed detail on the letters. So I just used my finger to press them down firmly, and it worked just fine. I did cut another piece of white cardstock to go on the back left of the card, so I could write a message. While I did have to think and focus all during the making of this card, I love the way it turned out!
Date: Thursday, March 14, 2019 GMT Views: 781
Favorited:6
Paper: Strathmore Vellum Bristol paper; Die Cuts with a View "The Citrus Matstack" patterned paper pad; Bazzill Whirlypop cardstock; blue, white, orange, yellow, red, green
Paper Size: A2
Ink: Ink on 3 Fadeout ink; Versafine Clair Morning Mist
Accessories: Spellbinders "Font One Uppercase" dies; Prismacolor colored pencils
Registered: March 30, 2008 Location: Somewhere between the Shire & Mordor! Posts: 4642
Sun, Apr 07, 2019 @ 6:07 PM
This is BEAUTIFUL, Andrea! ;) I've often thought this style would make a NICE Baby Card! BUT, I LOVE what you've done with it! (Oh how I WISH I could have kept in touch with my art teacher.... You're one lucky lady!) ;) AND I think I know what punch you were talking about, MS? When you commented on my card. ;) A SUPER IDEA!!! ;) INKY HUGS for your visit! ;)


 To measure for the cut lines, I began with the top step using the measurements in the instructions, and just calculated my way down from there. I did the same for the vertical score lines.