This card was made for Retro Rubber Challenge Blog #101 Happy Holidays photo inspiration challenge: https://www.retrorubberchallengeblog...-holidays.html I used the 4-year old stamp set from Stampin' Up! (SU) called "White Christmas".
Because the glitter cardstock I planned to use for the snow is so thick and NOT very bendable, I chose Stampin' Up! (SU) Whisper White Thick cardstock for the card base. I then reinforced the base by mounting it on a piece of SU Night of Navy cardstock after the card was done. The tutorial for how to make a bendi card can be found at: Bendi Fold Tutorials at Splitcoaststampers
This card only requires one sheet of 8.5"x 11" cardstock if you use the same color for both the background base card and the two bendable "wings".
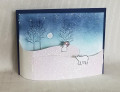
After cutting my card pieces (the base from SU Whisper White Thick cardstock, and the "wings" from Recollections glitter cardstock, I used craft sponges to sponge a sky that would be visible when the card is folded or set up in its bend-ed presentation like in the photo above. Near the "horizon" I used SU Bermunda Bay, then higher up I used SU Island Indigo, then at the very top I sponged with Night of Navy. I then used water in my Aqua Painter water brush to spatter onto the sponged sky. After this dried, I used a Zig Silver Oil Based Marker to dot snowflakes in the water spatters. One spatter was particularly large, so I filled it with the silver paint so that it looked like the moon with a darker halo around it. Onto the sponged sky I stamped the leafless trees from the 2014 SU "White Christmas" set using Stazon Jet Black ink.
I then attached the glitter "wings" per the tutorial referenced above using extra strong red double-sided tape. Note that I used my paper snips to curve the "wings" to make them look like glittering snow banks.
Per the inspiration photo I added a snowman from the SU "Winter Wonderland" stamp set using Stazon Jet Black ink. I added just a touch of red to the snowman's scarf, and orange to his carrot nose using SU Stampin Write markers. The bear was also stamped onto a scrap piece of SU Whisper White Thick cardstock using black ink. I then cut both the snowman and bear out using paper snips, and liberally covered them with a Wink of Stella clear glitter brush so they would glisten like the snow banks. They were attached to the snow banks using Mini Glue Dots.
After the card was finished, I felt that it was too plain, so added a panel of SU Night of Navy cardstock cut 1/4" larger than the card base. This of course means I will have to use a larger envelope than an A2 sized one, but I think it adds a lot to the card. If you wanted to keep the A2 size with the dark background, you could modify the size of the sponged panel by 1/4", but that will require modifying where you cut your slits for the bendable wings.
NOTE: This card would be easier if you used a lighter weight of cardstock for the "wings" than I did.
I am rating the difficulty level of this card as a "3" out of a possible "5" because of the precise measurements that you need to make for the slits and tabs. The photo tutorial and video help a lot, so be sure and refer to them.
Date: Saturday, December 8, 2018 GMT Views: 773
Favorited:5
Paper: SU Whisper White Thick Cardstock, Night of Navy, Recollections Glitter Cardstock
Paper Size: A2
Ink: Stazon Jet Black, SU Bermuda Bay, Island Indigo, Night of Navy
Accessories: Craft Knife, Craft Sponge, Wink of Stella Glitter Clear, Zig Silver Oil Based Paint Marker, Red Double-Sided Tape, Paper Snips, SU Aqua Painter