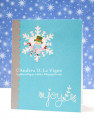
This card is kind of a companion to my "Joy Santa" card. I used the same sketch & greeting, and just switched out some of the supplies to create a more generic "winter" card. It was super easy to put together, since I had the greeting already mounted to my MISTI from my other card!
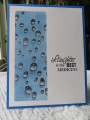
I cut & punched my border from silver shimmer cardstock & adhered that to an A2-size panel of blue cardstock. I positioned my snowflake die in the upper left corner of my panel, next to the border, and ran it through my die cutting machine. I positioned my panel over my card base (without any adhesive yet), & positioned my snowman so he is peeking out through the opening. I did add liquid glue to the back of the snowman sticker, just to give me a little wiggle room to adjust the placement. After I had glued him to the card base, I heat embossed my greeting on the blue panel. Finally, I adhered my card front panel to my card base. I used more liquid glue around the points of the snowflake, just to make sure everything would stay stuck down. I will be sending this card to Send a Smile 4 Kids.
Date: Thursday, November 15, 2018 GMT Views: 305
Favorited:3
Accessories: Sizzix/Tim Holtz "Paper Snowflakes Mini" die; Ranger Super Fine Detail White embossing powder; Fiskars "Scallop Sentiment" border punch; Snowman sticker from The Paper Studio
Registered: February 3, 2005 Location: Delray Beach, FL Posts: 34769
Fri, Nov 16, 2018 @ 12:38 PM
Oh my, another sweet card with this sketch! You are so wise to use some of the older sketches. I need to check those out, because I always struggle with layouts! Totally love this snowman and how you used the snowflake die for the opening for him. Brilliant idea and a sweet card! Some very blessed child will smile big with this one! Hugs and love! xoxo
------------------------------ Cheryl
Proverbs 3:5-6 My blog