Since both challenges wanted to see what we could do with our imaginations, I chose to once again tackle a card technique that I'd never done before - a pop-up card. I had bought Stampendous "Pop Up Stages Dies" several months ago, but hadn't used them, I figured now was the time!!!
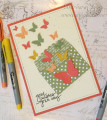
With the general theme of "feminine", my mind right away turned to my Adirondack chair die in Stampin' Up!'s (SU) "Seasonal Layers" Thinlits die set. I had seen a clever way to cut the chair to create a matching table, so a sweet pink drink and nearby flowering shrubs bubbled forth in my imagination.
I started with an 4.25" x 5.5" SU Whisper White panel that I sponged several clouds to the top inside panel using SU Soft Sky ink. I used a scrap scallop circle to sponge around the edges to create the clouds.
Using a scrap piece of SU Wild Wasabi, I tore the long edge in an irregular fashion for the background greenery. I glued this to the bottom of that sky panel since I wanted my pop-up mechanisms to blend in with the background (i.e. be the same color).
I then glued this grassy sky panel to the inside top of a standard A2 sized card base cut from SU Wild Wasabi cardstock.
The three pop-up mechanisms were created using Stampendous "Pop Up Stages Dies". A great video on how to use these dies in lots of ways can be found at: https://www.stampendous.com/shop/too...tages-die-set/ I made sure to die cut my three pop up mechanisms far enough apart, and a different depths to create a scene that the pop-ups wouldn't interfere with one another when the card opened and closed.
The Adirondack chair and matching table were cut from SU Whisper White Thick cardstock to make them sturdy. I used SU Snail Adhesive to run a strip of adhesive vertically down the middle of both elements. You don't want the adhesive to extend beyond the width of the stand-up part of the pop-up column so the card doesn't get stuck together when you close it.
The flowering shrub was made by stamping blossoms from the SU "Colorful Seasons" stamp set using SU Melon Mambo ink on SU Melon Mambo cardstock. I used my MISTI to position the flower stamens onto each blossom. Then cut each blossom out using it's matching die from the SU "Seasonal Layers" Thinlits dies. In addition, I used one of the blossom dies to cut out two "leave clusters" from SU Wild Wasabi cardstock. These leaves and blossoms were glued to the upright part of the pop-up mechanism using Tombow glue. The front-most blossom was attached with tiny piece of adhesive foam to give the bush depth.
A glass of pink lemonade was stamped similarly to the blossoms, and die cut with its matching die. It was tucked behind the white table where there was snail adhesive to hold it in place.
To hide the holes created by the pop-up dies, I cut a standard A2 card base from SU Wild Wasabi cardstock. I used the super strong red double-sided tape generously - especially near the edges, along the bottom and top of the folding mechanisms. I then CAREFULLY attached the folding inside piece to the Wild Wasabi card base.
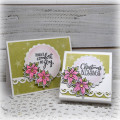
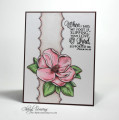
The front of the card was created by stamping the sentiment using the 2015 retired hostess "Happy Birthday, Everyone" set with SU Wild Wasabi ink onto a 5.25"x 4" piece of SU Whisper White Thick cardstock. I used my MISTI to stamp the sentiment several times to ensure a nice dark inking. The "amazing woman" part of the sentiment is from the same stamp set, but stamped with SU Melon Mambo ink. These inks were chosen to match the colors on the inside of the card. The flowers and leaves were created the same way as was done for the flowering shrub inside the card They were attached using Tombow glue, and one small piece of adhesive foam. The edges of the white panel were sponged with SU Wild Wasabi ink to soften the contrast between the panel and the card front.
The finished panel was centered and glued to the card front.
Note that this card is VERY thick and will need extra postage to mail it. It DOES fit inside a standard A2 envelope, however.
This card took me about 2.5 hours to make. I'm sure it would be quicker the second time around. Because of this, and the care it takes to create and assemble on the pieces, I am rating this card at a difficulty level of "4" out of a possible "5". I'm planning to send it to my MIL for her birthday next year. I know you will really like it!
Date: Wednesday, November 7, 2018 GMT Views: 945
Favorited:4