This card was made as a Design Team Call entry for Watercooler Wednesday's theme challenge #193 "Holidays".
As it's almost November, I'm into making all my Christmas cards, and this was the perfect opportunity to try yet another technique to create something special. The technique I am using is called "Out of the Box" because you create an image that extends outside a shape cut with a die. An oldie but goodie tutorial for this technique can be found on Splitcoaststampers at: Out Of The Box With Nestabilities Tutorials at Splitcoaststampers
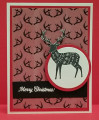
The stamp set I chose for this card is Stampin' Up! (SU) "Merry Patterns" with deer and traditional holiday sentiments. I began by stamping the deer onto a piece of SU heavy Whisper White cardstock (to give the deer's antlers some sturdiness once they were cut out). I stamped the deer using Memento Tuxedo Black ink. Then placing the circle die I wanted his body to be included in, I used a pencil and lightly marked to the left and right of his neck where I wanted his head to extend beyond the circle. Then using paper snips, I cut a line toward those two neck intersections vertically (on the right side of the neck) and horizontally (on the left side of the neck). Please view the video tutorial if you need clarification on how to cut. While simple, the way you do it is VERY important so you don't end up cutting off part of the circle that you want to keep.
Then, using small paper snips complete cutting out the neck and head that will extend beyond the die. Fit the die VERY SNUGLY to the places where the deer's neck will exit the circle, but make sure the head is on TOP of the die, not under it where it would be cut off. Then run the cardstock and die through your die cutting machine. I used a Post-It note to hold everything in place so the neck wouldn't slip away from the die when cutting. That's it! You should have a circle with the deer's head extending beyond it! I also die cut another circle slightly larger than the deer circle using SU Real Red cardstock. I glued this behind the deer circle, and set it aside to dry.
The background of antlers on the main panel was cut from the SU special vellum paper from SU's retired"Winter Wonderland" Designer Vellum Pack. It was cut to 3.75"x 5". I cut a mat layer from SU Real Red to 4"x 5.25". To assemble, I used an old craft sponge and dipped it into Tombow glued that I had squirted out onto a piece of scrap paper as my palette, then evenly spread the glue over the entire back of the vellum piece. I then carefully positioned it onto the red mat, and pressed firmly to ensure no air bubbles were trapped.
This matted antler panel was then glued to the standard A2 piece of SU Whisper White Thick Cardstock.
The sentiment is also from the SU "Merry Patterns" stamp set. I stamped it onto a strip of SU Basic Black cardstock using Versamark ink, then sprinkled Artfully Scribed Detail White Embossing Powder over it. After tapping off the excess, the sentiment was heat set using my heat tool. I trimmed it to the width of the vellum layer, and glued it down with Tombow.
The back of the matted deer circle had several pieces of adhesive foam strips attached to it to raise it above the card surface to accentuate the deer's antlers, then attached to the card front.
The hardest part of this card was fussy cutting the antlers. I intentionally left a white edge around the antlers to make them stand out more against the vellum background. I am rating the difficulty level for this card as a "2" out of a possible "5" because of the fussy cutting. If you have a matching die to the stamp you want to use for your own project, you could use the Partial Die Cutting technique to do something similar. Unfortunately, this stamp set doesn't have matching dies.
Happy Holidays!
Date: Friday, October 26, 2018 GMT Views: 545
Favorited:2
Paper: SU Whisper White Thick Cardstock, Real Red, Basic Black, Winter Wonderland Designer Vellum Pack
Paper Size: A2
Ink: MementoTuxedo Black, Versamark
Accessories: Sizzix Circle Dies, Spellbinders Nestabilities Circle Dies, Artfully Scribed Detail White Embossing Powder, Small Paper Snips, Tombow Multi Liquid Glue, Craft Sponge, Adhesive Foam Strips, Heat Tool
Techniques: Die Cutting, Fussy Cutting, Out of the Box Die Cutting