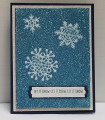
Our Design Team member, Diana Soling, is hosting November's technique challenge. She demonstrated how to use glitter as a background, so I was inspired to create a winter scene (lots of glitter and sparkles!!!).
The technique I used is called "Colored Glitter Inlay" and was featured on Splitcoaststampers at: Colored Glitter Inlay Tutorials at Splitcoaststampers I used the inlay idea, but instead of coloring the glitter with a marker, I used colored glitter. NOTE: You need to use very fine glitter for this technique.
The inlay technique requires that you use an extra thick base for your glitter panel so that when you use dies on it, they only cut partially through the panel. To do this, I cut two pieces of cereal box cardboard to 5"x 3.75", and glued them back-to-back with Tombow. Then cut the same size Stampin' Up! (SU) Whisper White cardstock, and a piece of Recollections Mounting Adhesive Sheets (aka double-backed adhesive paper). I removed one of the backer sheets protecting the adhesive sheet, and attached it to the white panel. Then glued this to the two glued-together cardboard panels. It's important that you let this sandwich dry COMPLETELY so that it doesn't move around in the next step when you run it through your die cutting machine.
I chose the three snowflake dies from the SU "Seasonal Layers" thinlits dies, and arranged them rather randomly on the thoroughly dried cardboard/adhesive sheet sandwich with the shiny adhesive backing paper face up and the dies on top of that.. I ran these through the die cutting machine several times to make sure I got a good clean cut partially through the sandwich.
Remove the dies and you should see the cuts on the shiny paper. Decide what color glitter you want to use. Since I was doing snowflakes, I wanted them to be glitter white. I carefully removed the baking paper covering the main body of each snowflake, then sprinkled each one LIBERALLY with SU "Dazzling Diamonds" glitter. I used my finger to press the glitter firmly onto the exposed sticky shape of the snowflake. If you were crazy enough to pick an intricate shape like the snowflakes I was using, you will have tiny bits of shiny paper still attached to the sticky panel where the snowflake has "holes". Do NOT remove these tiny bits until you are ready to glitter the background since you will want these the same color as your background.
After you have tapped off the extra glitter, you will still have LOTS of glitter covering the non-snowflake areas. Using a stencil brush or some other brush to sweep these glitter pieces away from the shiny surface you are going to lift off in the next step.
Peel off the backing sheet that covers the background area, and using a tiny tweezers or paper piercer, remove all the shiny bits interior to your die cut shapes (snowflakes). Now cover the entire project panel with your background glitter. In my case, I am using Recollections Ocean color extra fine glitter. Again, use your fingers to firmly press the glitter down onto the entire sticky background area before tapping off the extra glitter onto a scrap piece of paper.
By now you get the idea that there will be glitter everywhere! I haven't done this to my card, but it would be a good idea to use a spray sealant on the glittered panel to keep it from eternally leaving a trail of glitter on your recipient's hands, clothes, etc :-D
To finish the card, I rubbed SU Night of Navy ink on all the edges of the glitter panel to hide the fact that it is cardboard. Then using Tear & Tape (or the extra sticky double-sided red tape) attach the glittered panel to it's matting sheet. Since my matting was a 5.25"x 4" piece of glitter paper from DCWV Holiday Glitzy Glitter paper pad, I knew from previous experience that regular runner tape or glue doesn't hold to the glittery paper very well - hence the super sticky tape. I then glued this sandwich to the standard 5.5"x 8.5" A2 sheet of SU Night of Navy that I had scored and folded in half.
The final step was to add the sentiment. I chose the "Let it Snow" stamp from the SU "Happy Holidays" set, and stamped it using SU Night of Navy ink onto a scrap of white cardstock that I had cut narrow so I could feed it from the middle of the SU "Modern Label" punch so that I only punched on end (the label punch is to short for the full length of the sentiment). I then turned the narrow strip around and punched the other end as well. I used 2-Way Glue to cover the entire surface of the sentiment piece, then covered it with SU Dazzling Diamonds glitter. Again pressing it down to make sure it sticks. The SU Night of Navy matting for the glittery sentiment piece was made with a slightly wider piece of cardstock than the white piece, and slightly longer. I used the same technique to make the fancy ends with the SU "Modern Label" punch. The sentiment was attached to the glitter background using SU Tear & Tape.
I've never attempted a full glitter card before, so a big thanks to Diana for challenging us this month with this gorgeous technique!!!
I am rating the difficulty of this card as a "3" because of the tiny die cut bits I had to carefully remove. If you choose a more sensible die (i.e. not so many cutouts), the project quickly becomes MUCH easier!
Date: Wednesday, October 24, 2018 GMT Views: 702
Favorited:3
Paper: SU Night of Navy, Whisper White, DCWV Holiday Glitzy Glitter Paper Pad
Paper Size: A2
Ink: SU Night of Navy
Accessories: Recollections Mounting Adhesive Sheets, SU Seasonal Layers Thinlits Dies, SU Modern Label Punch, SU Dazzling Diamonds Glitter, Recollections Ocean Glitter, Tombow Multi Liquid Glue, SU Tear & Tape, Cereal Box Cardboard, Paper Piercer