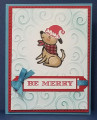
I faced three challenges in making this card. First, I really only have a couple "pet" stamps in my stash. I chose the little dog from Stampin' Up!'s (SU) "Bike Ride" stamp set. The problem was that he's pretty tiny, and I wanted him to wear a Santa hat from my SU "Holiday Sampler" set, which is way too big for him. My solution was to stamp the dog onto SU Whisper White cardstock using Versafine Onyx Black ink (nice a crisp that picks up tiny details), then scan him on my computer, and using Nova Development's "Photo Explosion" software, I enlarged the little pup so that his head was 1.75" wide at his brow, so it would fit the hat. I then printed him off onto the center of a piece of SU Whisper White cardstock.
My second challenge was that I wanted to do a partial embossing of a swirling snowstorm around him. So I cut two pieces of cereal box cardboard to the size of the panel I wanted to emboss (3.75"x 5.0"). Then using a Sizzix circle die that was big enough to fit eh puppy and his hat, I die cut matching holes into both pieces of cardboard, then taped them together as an embossing frame that will when used will emboss your cardstock where the cardboard is, but NOT emboss your cardstock where the hole is located. After creating my cardboard embossing frame, I place my piece of white cardstock that I had cut to 3.75"x 5" with the pup located in the upper center of the cardstock (I made sure this was aligned by putting the entire sheet of cardstock under my embossing frame, and using a pencil, LIGHTLY marked the corners of the frame on the cardstock with the pup and hat centered exactly in the round opening.) I then cut the panel using my paper trimmer.
To do the embossing I put the pup piece inside the Cuttlebug "Divine Swirls" embossing folder, then laid the embossing frame EXACTLY on top of it before running the sandwich through my Big Shot. You will need to play with which embossing plates you use, based on how thick you make your cardboard frame, and your own particular embossing machine. For my Big Shot, I ended up using the Big Shot Platform, Thin Die Adapter, my embossing folder with the cardstock inside, embossing frame, and one cutting plate (in that order). It turned out perfect, but how much attention to pay to alignment really makes all the difference!
I colored my little puppy with retired SU Stampin' Write Markers in Creamy Caramel, Rose Red, and Wild Wasabi. I stamped his hat using the Santa hat from the retired "Holiday Sampler" using SU Real Red ink, then covered the white fur of the hat with Zig 2-Way glue, then dusted it with Ranger Holographic Embossing Powder. I fussy cut the hat out with paper snips, then glued it to the pup's head with Tombow glue.
Using a craft sponge, I used SU Marina Mist and Soft Sky ink to sponge the tops of the embossed swirls around the do - the darker color around the edges.
I wanted to carry over the red theme of the dog's hat and scarf with the matting of the embossed panel, so use Sizzix "Dotted Rectangle" Framelits Die to cut a piece of SU Real Red slightly larger than the white panel. I liked the little holes all around the edge. To accentuate the holes, I used adhesive foam strips to mount it to the SU Marina Mist card base.
But before I attached the foam strips, I faced my THIRD challenge - I needed a sentiment, and I thought the "Be Merry" was perfect. It is from the retired SU "Holiday Invitation" stamp set. I stamped the sentiment with SU Real Red ink onto a scrap of white cardstock, then trimmed it to a rectangle. I created the red mat using a scrap of 2" wide SU Real Red and SU's "Scalloped Tag Topper" punch. I made sure the piece was at least an inch longer than the white sentiment piece, then punched one end. Using the white sentiment piece (and the punched scrap to help in spacing), I trimmed the punched red piece so when I punched the other end it would have enough space in the middle for the sentiment piece to fit. After the second end was punched, I used my paper trimmer to trim the top and bottom edges off the punched piece so it was slighting wider than the sentiment piece, and the scallops on both ends were even. I then glued the sentiment to the punched piece, and ran a piece of blue ribbon thru the tag holes and taped them on the back of the swirl embossed panel. As an added step, I used my "Bow-Easy" tool to tie a tiny blue bow, and affixed it to the sentiment piece using a Mini Glue Dot.
Finally, I glued the embossed panel to the red dotted rectangle mat panel, then using adhesive foam strips attached the matted assemblage to the SU Marina Mist card base.
I think the card is super cute, but it sure took a lot of work due to the three challenges I encountered in making it (wrong size puppy, creating an embossing frame, and creating a sort-of-fancy sentiment mat). I am giving this card a difficulty rating of "5" out of "5". If you already have an embossing frame available (you can buy plastic ones), the card would be a lot easier.
I am also submitting this card as an entry to 52 Christmas Card Throwdown's Design Team call.
Date: Saturday, October 20, 2018 GMT Views: 554
Favorited:2