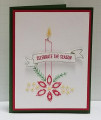
I had never done paper embroidery before, but was introduced to it by a friend from Perth Australia two weeks ago... great timing, huh???
There are several companies that make patterns for paper embroidery - you just select your pattern and place your heavy cardstock beneath it and prick the paper based on the pattern. These holes in your cardstock are where you do your embroidery. You don't want lumps under your finished piece, so you tape the start and end threads on the back of the card. It took me about 90 minutes to do this piece (it was my first, so I was extra cautious).
The sentiment was stamped onto a banner from the SU "Birthday Banners" set using SU Garden Green and Real Red inks. The banner was hand cut using paper snips. It was adhered to the embroidered panel using adhesive foam strips.
The main panel was glued to an SU Real Red matting, which in turn was glued to the SU Garden Green card base.
The entire main panel is stitched with embroidery thread left over from another project - even the candle. Only the banner and sentiment were stamped.
I am rating the difficulty level of this card as a "3" out of a possible "5" because I was learning to do paper embroidery, and the time it takes to do all the stitching. Embroidery is definitely more time consuming that stamping - but I'm happy with how the card turned out for my first attempt! Thank you, Peggy from Perth!!!
Date: Friday, September 28, 2018 GMT Views: 462
Favorited:2