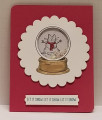
I don't own any oval dies, so chose to go with a round theme, which included a scallop background, and tiny scallop "snowflakes" inside the snowglobe.
I started by stamping the snowglobe image from All Night Media "Snowglobe" set, whichI purchased in 2002, onto Stampin' Up!'s Whisper White thick cardstock using Memento Tuxedo Black ink. I then positioned one of the large scalloped circle dies from Spellbinders and ran it through my Big Shot. To create the snowglobe opening, I used the 1-5/8" circle from Sizzix Framelits dies.
To create the inside of the globe, I die cut a circle larger than the globe opening, then inked up the globe "glass" portion of the stamp with SU Stampin' Write Marker color Blue Bliss, and stamped it in the upper part of the circle. I then chose a snowcat stamp from the same set and stamped him in the center of the "glass" with Memento Tuxedo Black ink. He was then hand colored using the blue marker and the Baroque Burgundy marker. While I had my markers out, I also colored the snowglobe "wooden" stand with Creamy Caramel.
On the back of the scalloped circle I used Tombow glue to attach a larger circle of SU Window Acetate, then attached adhesive foam strips all around the window opening to raise the scallop off the card and contain the "snowflakes" I was going to add.
I test positioned the scallop circle to get an idea of where I wanted the scalloped circle to go, then glued the snowcat circle onto the SU Rose Red card base so it would be right under the snowglobe window.
I used a punch I've had for years that makes tiny flowers of assorted flowers to punch out several sets from the pinkish cast glitter paper. I then carefully stacked these glittery "snowflakes" on top of the snowcat glitter side up.
The adhesive foam strips backing tape was removed from the back of the snowglobe, and the scalloped circle was attached directly over the snowcat so he was showing through. Because of how thin a space was left between the snowcat the the acetate window, I don't think any of the glittery snowflakes will flip over to show their plain white back.
The sentiment from the SU "Happy Scenes" set was stamped onto a thin strip (~1/2") of SU Whisper White cardstock using SU Marina Mist ink. This strip was then punched by slipping only one end at a time from the outside of the SU "Modern Label" punch center opening (since the sentiment is longer than the punch). The sentiment strip was then attached with adhesive foam strips.
The final step was to continue with my "round" theme byusing a Marvy corner rounder punch on the car base upper left and lower right corners.
I am rating this card as a difficulty level of "2" out of a possible "5" since each step is pretty straightforward. If you are new to stamping, it would probably be a "3".
I have a friend who loves cats, so this card will be sent to her this coming holiday season.
Date: Sunday, September 2, 2018 GMT Views: 822
Favorited:3