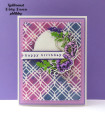
Having the sketch and colors decided, made the card design come together pretty quickly. The card base is the standard A2 (5.5" x 8.5" folded in half) using Stampin' Up! (SU) Bermuda Bay cardstock. The matting is SU Whisper White cardstock cut 5.25"x 4"
The main panel is the star pattern pattern paper from the retired 2014 SU "Motley Monsters" designer series paper, and plain SU Bermuda Bay cardstock cut at a diagonal. This was glued using Tombow to the white matting layer. A piece of black and white ribbon was glued using SU Snail Adhesive over the diagonal join.
The star was created by inking the middle sized start from the SU "Bright & Beautiful" stamp set first with Versamark, then with Memento Tuxedo Black ink, then stamping on SU Whisper White. Note, to save paper, I did this in the middle of the white matting layer before I glued the layer onto the card base. I then sprinkled clear embossing powder on the stamped star and heat embossed it with my heat tool. The star was then die cut out using the stamp set's matching SU Stars Framelits Dies. I wanted the star to stand above the card front, so I also die cut another star out of scrap cardboard (could be a cereal box or the backing for a paper pad). This was glued to the back of the stamped star cutout using Tombow glue, then glued onto the card front.
The banner was made by inking the sentiment from the "Bright & Beautiful" stamp set with Versamark, then with Memento Tuxedo Black ink onto a scrap piece of Whisper White. I heat embossed it to give the sentiment the same glossy look as the star. Because the sentiment was longer than my banner die, I die cut the banner out by only partially die-cutting the sentiment starting from the flagged end. I then used my paper trimmer to extend the sides of the banner passed the sentiment. I felt the banner was a bit too wide, so used my trimmer to cut off some of the long lengthwise side on both sides to narrow it. The banner was then embellished using a star brad from Michaels. I found it was easiest to first press the 5-brad ends into the paper atop a foam pad to mark were the points would be entering the banner, then using my paper piercing tool to punch the holes all the way through before crimping them on the back of the banner. This prevented crushing of the cardstock when the brad was pushed through it.
The banner was attached to the star with Mini Glue Dots onto the star. To support the tail of the banner that extended beyond the star, I put a single piece of adhesive foam.
Since one of my favorite colors is aqua, this coloring of the holiday card really appeals to me! I am rating its difficulty level as a "2" out of a possible "5" because of the need to heat emboss, and create the diagonal joining of the front panel. Not super hard, but requires some care and attention.
Date: Monday, August 13, 2018 GMT Views: 867
Favorited:3
Paper: SU Bermuda Bay, Whisper White, Motley Monsters DSP
Paper Size: A2
Ink: Memento Tuxedo Black, Versamark
Accessories: SU Stars Framelits Dies, Banners Framelits Dies, Tombow Multi Liquid Glue, Cardboard, Mini Glue Dots, Celebrate It Black Striped Ribbon, Michaels Black Star Studs, SU Snail Adhesive, Clear Embossing Powder, Heat Tool, Adhesive Foam Strips