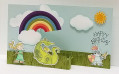
I had a "paper piecing" things I have wanted to try for quite some time with the Stampin' Up! "Magical Day" stamp set. Since I have grand-daughters, it always bothered me that the set had a boy as a knight in shining armor, and the girl as a mermaid. What I wanted was an adventurous girl and her dragon - just like Daenerys from "Game of Thrones". I had seen a clever way to piece together two parts of the mermaid and the knight to create just such a dazzling powerful woman on Jane Allmark's blog (http://amethystarcrafting.blogspot.c...-and-her.html), so wanted to create a little girl's birthday card using her piecing technique.
My card base is an 8-1/2"x 4- 1/4" piece of SU Soft Sky cardstock scored and folded at 2-1/8" and 4-1/4" into a z-fold shape. For a great tutorial on double z-fold cards, check out Natalie Lapakko's great tutorial at: http://stampwitch.blog/petals-and-pa...e-z-fold-card/
I created the grassy "ground" for my double z-fold section by stamping the "ocean waves" from SU "High Tide" set vertically on my 1-1/4" wide strip of SU Old Olive cardstock, using SU Old Olive ink. I then used my Westcott fringe scissors to cut "grass blades" all along the top edge of the strip. I decided I had made the grass a little to "deep", so used regular paper snips to "mow" my grass by about 1/4" to shorten them. The "grass" was then attached to the card front and the card back using super strong SU Tear & Tape because of the stress the card would undergo being opened and closed repeated times. Note that before I glued the strip to the back, I created a matching 1" strip of green cardstock 4-1/4" long that I also glued to the bottom inside of the card so that there would be "grass" along the entire inside, even where there wasn't fringed grass. Just for fun, I made an extra 5" strip of fringed grass, and folded 1/4" back on either side and inserted it halfway between the front fringed grass and the back of the card. This was so I could attach another figure, if I decided to, and to fill up the "hole" behind the dragon.
Speaking of the dragon, I colored him and the knight with Copic Markers, and die cut both with their matching dies from the SU "Magical Mates" framelits dies. On the dragon, I did some extra hand-trimming with paper snips to remove the white cardstock left by the die around his wings.
I then colored and die-cut the brave little girl (per Jane's blog mentioned above. To hide the seam where the two bodies joined, I tied two wrappings of SU Linen Thread around her waist with a simple knot. She, the knight and the dragon were all attached to the grass using Mini Glue Dots.
The clouds and rainbow were all die cut from the SU "Rainbow Builder" framelits. The colors for the rainbow are listed in the supplies list right under the card photo. I pieced the rainbow together by laying down a piece of Scotch tape sticky-side-up, and very carefully placing each arc of the rainbow snugged against it's neighbor. I added two more pieces of tape to the back of the rainbow, then trimmed off all the excess. I wanted the rainbow to be sturdy since I was going to be attached to the card only at one end.
Each of the clouds were lightly sponged around their edges using SU Soft Sky and a craft sponge. They were sponged a bit darker on their "bottom" edge as if they were shadowed on their bottoms.
The rainbow was attached to the front panel using SU Tear & Tape, the cloud on the front panel was attached with Tombow glue (on just the left side) to cover the bottom of the rainbow. The large cloud that wraps from the front of the card, around to the inside back was also glued with Tombow. The little cloud above the knight was attached with adhesive foam tape so he "floated".
The sun was created using the sun stamp from the SU "Sunshine & Rainbows" set using SU Crushed Curry ink on SU Delightful Daffodil cardstock. It was die cut with its matching die from the "Rainbow Builder" framelits. It was also attached to the inside of the card using an adhesive foam strip.
Finally, the birthday sentiment from the retired 1995 SU "Button Bear" set was stamped using Memento Tuxedo Black ink.
Because the card has so many steps, and paper pieced both the rainbow and the little girl, I am rating the difficulty level as a "4" out of "5". But it was worth it!!!
Date: Tuesday, July 17, 2018 GMT Views: 830
Favorited:3