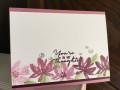
When I saw the challenge was "glitter" I recalled that I had a blueish glitter scallop diecut left over from a previous project that would be perfect. I'm always in need of anniversary cards, and inspired by Kathleen Wingerson's layout at: https://kathleenstamps.com/?s=striped+scallop, I decided to make a flap card with all kinds of glitter and sparkle!
Since I wanted the card to be the full A2 size, I right away had to wrestle with the fact I didn't have any thicker white cardstock bigger than 8.5"x 11". So, I got creative and cut a piece of SU Whisper White Thick cardstock in half lengthwise to create my card base of 4.25"x 5.5" once I folded it in half. I used my paper trimmer to cut just a smidgen off the short side of the folded cardstock to ensure it would fit in an A2 envelope. I had to do this because to create the flap I need, I had to cut an additional piece for the flap that measured 4.25"x 2.5". I scored 1/2" from the end along the wide (4.25") side so it could fold over the back of the card and be attached by Stampin' Up Tear & Tape (super strong!). This created my flap for decorating in a later step.
Since I already had the scalloped piece (slightly blue glitter), I glued it to the card front (remember, a flap card opens from the TOP!). For the top part of the front of the card that wasn't covered by the scallop, I cut a piece of SU Soft Sky cardstock and glued it to cover the remaining white area of the card front. I did this to add interest for when the card was opened, and to reinforce my light blue color scheme of the scallop and my planned flowers.
Speaking of flowers, the next step was to create my glittery flowers. I don't have light blue glitter, but I created the look I wanted by inking up my SU "Flower Power" stamp that looks like a daisy first with Versamark, then with SU Soft Sky ink. I then stamped it on a piece of SU Whisper White cardstock, and immediately sprinkled SU "Heat & Stick" powder that gets sticky when it's reheated. I reheated the flower to make the image sticky again, and sprinkled SU "Dazzling Diamonds" glitter over the flower. Just to make sure the glitter stuck, I briefly reheated the image for a third time. I created three flowers like this, then using the matching SU "Pansy" punch, punched all three flowers out.
The next step was to create the background foliage for the planned flower cluster. I did this by die cutting larger leafs from scrap pieces of the blueish glitter paper, then running the die, with the diecut still inside it, back through my Big Shot using a rubber impression mat under the die. You will need to adjust any shimming to compensate for the rubber mat, depending on how thick the mat is. Don't force the impression mat sandwich through your Big Shot, or you will break it! I cut two of these large leaf sprigs. To carry over the color of my planned sentiment, I also cut flower sprigs from SU Basic Black cardstock using a Spellbinders Shapeabilities "Foliage" die.
These foliage sprigs were glued to the card front after "dry fitting" the three flowers so I had an attractive cluster. Then I permanently attached the flowers to the card front. The bottom two were glued with Tombow glue, and the top flower was attached using an adhesive foam strip so that the top two petals of the flower could serve as the "closure" mechanism for the flap card. Be sure to place the foam strip far enough down on the backside of the flower to allow the card flap to slip all the way behind it.
I stamped the Rubber Stampede sentiment toward the upper left of the card flap using Versafine Onyx Black ink because some of the sentiment font stokes were very thin and fine.
The flap still needed something so the closure flower didn't just hang there in mid-air, so I cut the top three leaves of the second large glitter foliage die cut, and glued it to the bottom edge of the flap so it looked like a continuation of the rest of the flower cluster foliage.
This card was fun to make, and required that I do some creative adjustments to make it work like I envisioned it. Now that you have the detailed instructions, I would rate the difficulty level as a "3" out of "5" just because of all the steps required. None of the steps are difficult, but taken together, you need to spend about 20 - 30 minutes to create it. I think it's well worth it, though!
Date: Friday, June 29, 2018 GMT Views: 2155
Favorited:3
Registered: June 27, 2012 Location: Washington Posts: 25246
Wed, Jul 04, 2018 @ 2:22 PM
That is a beautiful card...love all your details. . .you certainly had to do a lot of adjustments to end up with this delight! I've always loved that Flower Shop stamp set and pansy punch. I just used it myself on a card after languishing in my stash for over a year!
------------------------------ Carlene aka Chatterbox-1--My BLOG; My Pinterest;My SCS Gallery; FAVORITES Team Member; 2022 Christmas Card Challenge 75/105. My SCS Goal: Challenge Catch-up; Sketch Challenge Sample Card Team (August 2022--January 2023).