I need birthday cards, so I went rummaging through my stamp stash, looking for inspiration. I found this cake stamp filed under "Miscellaneous," instead of "Birthday"! I had honestly forgotten I had it, and have no clue what the name is or where it came from (though possibly from Hobby Lobby many years ago). But I decided it would be perfect for this sketch.
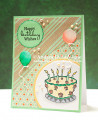
I placed the cake stamp in my MISTI, masked off the plate, and inked up just the cake & candles with Versafine Onyx Black. I stamped it onto a scrap of bristol paper. I dried the ink, cleaned the stamp, masked off the cake, and stamped the plate with Versamark ink. I silver heat embossed just the plate. Since it has the relatively large triangle pattern on the plate, I didn't want that in black, hence the two-tone stamping.
I colored the cake with my Tombow markers. Because of the roses on the cake, I didn't bother with any shading, figuring it would just be too fiddly. I also colored in the remainder of the plate with a cool grey marker & added a light shadow underneath with a warm grey marker. Finally, I used a circle die to cut the panel, and used the next larger die to cut a mat from yellow cardstock. I adhered them together, and set that aside.
I cut my patterned papers to 4" wide, and die cut the lower edge of the upper paper with the "A2 Curved Edge" die, as per the sketch. I cut the floral paper down, and adhered the striped paper on top, so that the final measurement came to 4x5.25". I adhered my cake panel in place, and used my scissors to cut off the overhanging parts from that.
I stamped the greeting in the middle of a panel of green cardstock with Versafine Onyx Black ink. (I planned to use this as my mat, so made sure the die cut opening would be covered by my patterned paper.) I die cut it with a "Nesting Scallops" die, inked the perimeter of the circle with Evergreen Bough, and adhered it to my card front. I then adhered my patterned paper panel to the green cardstock.
I die cut 2 balloons from bristol, and colored them with Tombow markers, using a water brush to blend the color out to provide shading. For the balloon strings, I tied crochet twine around the bottom of each balloon. I ran Perfect Paper Adhesive liquid glue down the length of each string, and wrapped each around a paintbrush handle. I left those to dry completely, so the strings would be curly.
After my balloon strings had dried, I glued the balloons to the card front. I used a dot of glue for each string, just to tack them down so they weren't quite so unruly. I coated the balloons with a Spectrum Noir Clear Sparkle pen. I adhered my panel to a white card base, and added Nuvo Crystal drops as a finishing touch.
Date: Saturday, June 16, 2018 GMT Views: 621
Favorited:2
Registered: August 10, 2006 Location: Sunny Florida Posts: 25290
Sat, Jun 16, 2018 @ 9:02 PM
Andrea, this is a gorgeous birthday card! The cake is beautiful and the balloons are a great addition. The designer paper is fantastic as are the embellishments! Great work, Andrea!!