I've always loved purple, and since I wanted to use some of the Stampin' Up! retiring purples, this was my opportunity to feature at least three different shades!
I started by cutting two panels (SU Elegant Eggplant and Sweet Sugarplum) 4"x 5-1/4", then cut each diagonally from corner to corner. I then put one triangle of each color snugly together to re-form the original size panel. I place these two in the Cuttlebug Floral Fantasy embossing folder, and ran them through my Big Shot. I did this step as an alignment guide for the next step.
Following the steps of the "faux letterpress" technique, I inked the inside of my embossing folder, on the side that says "Cuttlebug" gently with SU Elegant Eggplant. If you press too hard the ink gets in between the raised parts of the folder, which isn't the effect you want. Then I repositioned my pink triangle so it fit the embossing folder pattern on the UN-INKED side, and carefully closed the folder and ran it through my Big Shot again. This put the purple ink on the RAISED part of the embossed pattern. Completely clean your embossing folder with a wet wipe to remove ALL of the purple ink. Then using SU "Pretty in Pink" ink, I did the same thing with the purple triangle.
I fitted the two triangles together, and gently taped them together on the back side, making sure to fit them snugly.
I then glued these fitted triangles onto my standard A2 (5-12"x 8-1/2" folded in half) SU Perfect Plum cardstock so the card base formed a matting for the embossed pieces.
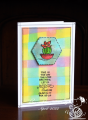
The challenge sketch shape was the hardest part for me since I don't have a cutting die for that shape. I made my own by using my paper trimmer to cut a SU Whisper White rectangle 3-1/2"x 1-3/4". Then marked with a pencil on the short sides exactly at the half point (7/8"), then from that point I marked on both the long sides 3/4" from the corners. Using my paper trimmer I cut from the short side center to each mark I had made at that end.
Using a paper piercer (pointy tool) and a plastic template from the retired SU Paper Piercing Pack Essentials" I poked holes all along the perimeter of my white hexagon shape.
To create the SU Perfect Plum inner shape, I just cut a rectangle 3-1/4"x 1-7/16", and using a pencil marked where I needed to trim the corners off using the white pierced piece as my guide. After cutting the corners off with my paper trimmer, I glued the purple piece inside the pierced lines of the white rectangular hexagon.
The sentiment was stamped using my MISTI so I could re-stamp with Versamark EXACTLY over the top of the SU Elegant Eggplant sentiment. I inked the sentiment first with Versamark, then the Elegant Eggplant and stamped. Then for good measure, I cleaned the stamp off with a wet wipe, and re-inked it again with Versarmark, and re-stamped to ensure good sticky coverage of the letters. I then dusted the sentiment with clear embossing powder and heat set it with my heat tool. This gave the sentiment a nice glossy finish.
After attaching my sentiment piece to the card front with adhesive foam strips to raise it up a bit off the textured surface, I finished the card off with a small bow made from Offray purple cross-grain ribbon. The bow was attached with a Mini Glue Dot.
Once again, this card wasn't difficult, it just required several steps. Because of that, I am rating it a difficulty level of "2" out of "5". It's a very feminine card, so will be great to send to one of my sisters this coming year!
Date: Monday, June 11, 2018 GMT Views: 479
Favorited:3