This card was made for Try Stampin' on Tuesday sketch challenge #367 with the optional challenge of using metallic accents: http://trystampinontuesday.blogspot.com/
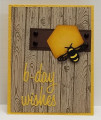
The hexagon right away made me think of a bee hive, so my design thinking went in that direction. I imagined there was a hive of bees in an old barn on my grandfather's farm where I used to play back in the 50's and 60's.
I started with a 4"x 5-1/4" piece of Stampin' Up Crumb Cake card stock, and stamped SU's "Hardwood" background stamp on it with SU Early Espresso ink. The best way to use these large background stamps is to lay the stamp, inked side up, on your work surface, then lay your cardstock on top of it. Cover the cardstock with a piece of scrap paper and use your hand to press down all over the background stamp to get an even inking. This allows you to maintain more control over where the cardstock lays on the pattern, too.
I had a heck of a time finding a hexagon that was the size I wanted it. No stamps or punches I own even came close! So I used Microsoft Word to create a hexagon the size I wanted, then with a dab of glue, attached it to my SU Hello Hone cardstock and cut it out with scissors.
I used both Crushed Curry and Hellow Honey ink to sponge all around the edges of the hexagon to give it depth like a cell in a honeycomb.
The "hinge" on the card was created using scrap Early Espresso and Chocolate Chip cardstock. I used a paper piercer to punch small holes in the four corners of the hinge after I glued to two pieces together. Then inserted black brads as "nails" in the hinge. This hinge assembly was then glued to the hardwood panel. The sponged hexagon was glued atop the hinge per the sketch.
Instead of a "dot" like the sketch suggested, I attached a honeybee I die cut from SU's " Detailed Dragonfly" die set. I first diecut the bee outline using Basic Black cardstock, then roughly cut an oval using Hello Honey cardstock to glue behind it. As an added touch, I roughly outlined the bee's wings onto a piece of clear acetate, then cut them inside the outline to fit behind the wings to give them an extra "glimmer".
The sentiment was cut using Sizzix Tim Holtz "Celebrate" thinlits dies. I wanted to carry over the "bee" theme, so I die cut "birthday wishes, then trimmed off the "irth" from birthday, and used the center of the "e" from wishes as the dash between the "b" and "day". These letters were glued down with Tombow glue.
The card base is SU Hello Honey cardstock that I ran just the front through my Big Shot using a honeycomb embossing folder.
Once I figured out what I was going to do, the card came together pretty quickly. The hardest part was cutting the acetate wings to fit behind the bee. I am giving this card a difficulty rating of "3" out of "5".
Date: Tuesday, April 24, 2018 GMT Views: 941
Favorited:5
Registered: June 4, 2009 Location: Deatsville, Alabama Posts: 82086
Sun, Apr 29, 2018 @ 7:37 AM
Super fun!
------------------------------ Nancy Williams - Hope your day is Spirit-filled and ink-filled (in that order)!DRS Designs-DT, Punchkateerforever, Dirty Dozen Alumni