My finished card is 5 x 7". I made the card base from instructions on Pinterest. I cut two pieces of cardstock 10 X 7 and scored both at 5” and 7 1/2”. Glue two pieces together making a card base of 7” X 15”.
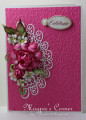
I covered the panels inside and out with pieces of the paper collection. I cut a piece of white cardstock 2 3/4 x 3 3/4 and covered with another piece of the paper collection. I also stamped a sentiment on this panel with black ink. I glued it down just on the left-hand side so it wouldn't interfere with the opening of the card. I made a second panel identical to the first and stamped a sentiment on it as well and then glued it to the inside, so it would cover the plain cardstock back.
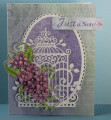
Next, I fussy cut a piece of the paper to make a pocket for the inside center panel. I used Scor-Tape to adhere it to the panel, so I could slip tags down inside. I cut out tags from the paper Collection and tied ribbon through them and slipped them inside the pocket.
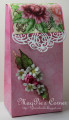
To make the bellyband I measured a piece of white cardstock 2" wide by enough to reach around the card and lap over a bit. Make sure you allow a bit more so it will slide up and down over the card. Cut out two pieces of the decorative die and glue them to the edges of the belly band. I then covered it with piece of the decorative paper collection.
Stamp and cut out the flower petals, leaves and other elements using coordinating inks. I colored and then shaped the flower petals with the mold and continued shaping with the Deluxe Flower Shaping Kit. Add some glue to the flower petals and sprinkle the Crystal Clear over them. Set aside to dry. I also colored and shaped the leaves and set them aside to dry. Then the little flower I stamped, cut out and added the shaved ice and set aside to dry as well. Once all were dry I glued it all down and then found a sentiment on the paper collection and cut it out and used dimensional tape to adhere to the belly band
Date: Wednesday, March 14, 2018 GMT Views: 696
Favorited:3