I've been on a Spring card creating kick of late, mostly for Send a Smile 4 Kids. Their Easter/Spring deadline is coming up quickly, so I've been focusing more on cards for them. They like to have Easter cards 3-4 weeks ahead of time, so they have a chance to ship them & the hospital staff has a chance to deliver them to the children. Anyway, on to the card....
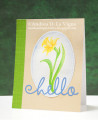
I stamped the daffodil onto mixed media paper with Lemon Yellow ink. I wanted to do some no-line coloring, and this seemed perfect. Granted, you can still kind of see the lines, but they blend into the coloring pretty well. After I die cut the panel with a stitched oval die, I colored the image with my Inktense pencils. I picked up the color from the pencils with a damp paintbrush and applied it to the paper. After the color had dried, I applied a light wash of blue watercolor around the perimeter, to give sort of a "glow" or halo effect.
I used a panel of beige cardstock for my card front panel, and added a strip of green patterned paper from my scrap stash to the left side, as per the sketch. After the focal panel had dried, I adhered it to the background.
I die cut the greeting from blue cardstock that I had backed with Stick It adhesive. I adhered that to the card front, overlapping the bottom of the flower stem. It was a bit tricky to get the greeting straight on the card, mostly because it's a pretty delicate die cut, and so "wanted" to become distorted. I did try using the negative piece from the die cutting to line it up, but then I couldn't see exactly where it was going relative to the image! So I ended up just winging it. Thankfully, Stick It is pretty forgiving, at least until you burnish it down, so I was finally able to get everything where I wanted it. The last step was just to adhere my card front to a white card base.
Date: Tuesday, February 20, 2018 GMT Views: 500
Favorited:2