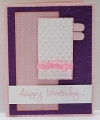
I started by running a 4"x5-1/4" panel of Stampin' Up! Elegant Eggplant cardstock through my Big Shot inside the Cuttlebug embossing folder "Spots & Dots". To add extra contrast, I used a brayer and ran it gently several times over the raised figures using SU "Pretty in Pink" ink (faux letterpress technique).I glued this to the "Pretty in Pink" card base using Tombow glue.
The tall polka dotted pink panel was from the retired
SU Designer Series Paper (DSP) "Sweet Pea". To give more contrast, I used a stamping sponge to brush "Pretty in Pink" ink all around it's edges, then glued it down to the Eggplant panel.
The Whisper White panel was run through the Big Shot using the SU "Swiss Dots" embossing folder. Then, again I used faux letterpress technique to apply pink ink gently atop each dot. The edges of the panel were sponged with the same ink. A piece of "Pretty in Pink" ribbon was tied into a bow and wrapped around the white panel. The two tabs on the right of the white panel were created using the retired "Word Window" punch. I glued the tabs to the back of the panel before adding adhesive foam strips to the white panel to attach it to the card raised up a bit for depth.
Finally, the birthday sentiment was stamped using the SU "Endless Birthday Wishes" set. Since I wanted the sentiment to be the same "Pretty in Pink", I knew I would need to stamp it multiple times, so I used my MISTI four times to get the darker solid pink color I wanted. This panel was attached to the card front using adhesive foam strips.
The card wasn't difficult, but did require several steps. Because of this, I am rating the difficulty as 3 out of 5.
Date: Monday, January 15, 2018 GMT Views: 473
Favorited:2