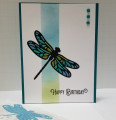
With a central focus on the dragonfly, I didn't want to clutter the card up with other details. I started by sponging a 1" strip down the vertical off-center of a 4"x5-1/2" panel of Stampin' Up! Whisper White cardstock. I masked the area with Post-It Notes to protect the rest of the card. The colors were SU Wild Wasabi at the bottom, blending to Coastal Cabana, then Marina Mist at the top.
I then used the smaller dragonfly from SU's Detailed Dragonfly Thinlits Die set, and ran it through my Big Shot placing the die just below center of the card. Then I adhered One-Sided Scotch Tape on the BACK of the panel so the tape completely covered the dragonfly cutout.
The next step was to die cut the dragonfly again, but this time on SU Basic Black cardstock. Using a die cut brush and foam pad, carefully removed all the little black cutouts from the dragonfly outline. Carefully place this outline into the dragonfly shaped hole in your sponged panel, and press down onto the tape showing through.
Next, is a trick I learned on Pinterest last year for easy control of your tiny die-cut pieces. Take 3-4 dryer sheets (preferably unscented!) and fold them to make a 6-8 layer sandwich. Place this on top of your die-cutting machine bottom plate, then your cardstock on top of that. Next place your intricate die and your top plate and run through your machine two times. This will allow you to easily remove the cardstock excess, leaving your cut image stuck to the dryer sheet sandwich. No more flying and mixed up pieces when you want three different colors in your final dragonfly. You can see in the bottom left corner of the card photo the Marina Mist die cut with the tiny blue pieces I had removed to stick into their corresponding spots on the card. I ran all three colors (Marina Mist, Bermuda Bay and Old Olive) as three separate dryer sheet sandwiches so I could remove the tiny pieces with my crafting tweezers to place them exactly where I wanted them in the finished dragonfly. I'm keeping these leftover dragonflies to use on a future card where I will just reverse the colors to take advantage of what I didn't use on this card! The pieces will stick nicely to the dryer sheets until you need them.
Finally, I stamped the birthday greeting from SU's "Lift Me Up" set onto the bottom of the card, and added three SU Island Indigo Candy Dots in the top right corner to finish it off.
I rated this a difficulty level of 3 just because of the time it takes to place all the beautiful jewel colored pieces into the dragonfly's wings. It's not hard at all, just takes time and tweezers!
Date: Thursday, December 14, 2017 GMT Views: 1007
Favorited:8