This card was made to Tic-Tac-Toe Challenge #024: https://tictactoechallenge.com/ The challenge requires you create a card based on any three rows of the tic-tac-toe grid. I chose the left vertical row that contained: angled, die cut, greeting.
I wanted my card to be all about angles, so found the "tuxedo card" on Pinterest created by Keren Howell. I used her template for the card base, which you will find here: https://www.pinterest.com/pin/134826582576867282/ along with her great video. Note that her measurements are for an A4 sized base card sheet, which is approximately 3/4" longer than A2 paper. Just ignore that for now, and proceed making your card base. There will not be a score at 11" per the template, but you will create the tab for linking the two front edges later. Just use the template as is.
Please refer to the template at the link above for all scoring and cutting lines of the tuxedo card base.
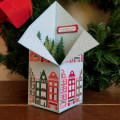
Once you have your base, you will need to cut six panels of designer paper. This requires that you plan ahead for what papers you want to go in each location. In my card you see that I put the two panels of "houses" paper in the front, "snowy sky" on the "lapels" of the tuxedo card, and on the pointed background.
The measurements for the cuts are:
"houses" panels: 5-1/2" x 2-1/2" (cut 2)
"lapels" panels: 5" square panel (cut 1)
-or- use the triangles cut off the upper background
panels or the front "house" panels
"upper background" panels: 5-1/2" x 2-1/2"
The triangles for the front "house" panels are marked at 3" from the BOTTOM of each panel. BE SURE AND MARK THE OPPOSITE INSIDE EDGES when you do this. Then, using your trimmer, cut from the TOP corner opposite where you marked, at an angle, down to your mark. Think this through carefully before you cut!
Glue the two angled panels to the front panels of your card base.
The "upper background" panels are cut in a similar fashion, except you mark the OUTSIDE edges 3" from the TOP. Then cut from your marks to the top opposite corners to create your top angles. Glue these in place inside the card.
Finally, you can use any of the triangles you have from cutting your front and background panels,,,, either, the front or the back side of your designer paper, OR cut a 5" square from a totally different designer paper, which you then cut in half diagonally to create your triangles.
Now to cut the mechanism for holding your "stand-up features" inside the card. Cut two 3/4"x 3-3/4" strips of cardstock. They can match the card base color, or choose a color that blends in with whatever "stand-up features" you plan to place inside. These strips will hold those "stand-ups". Score each end of these strips 1/2" from each end, and bend them back in opposite directions on each strip, so they form a "Z". See the video on the link above at 12:20 for how to glue and place these strips inside the card.
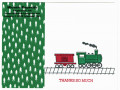
Now you are ready to attach you "stand up" elements inside your card. I chose trees, but you can use flowers, balloons, or anything that seems appropriate for your theme. I attached them with Tear & Tape, rather than glue so that they adhered immediately, and didn't run the risk of moving around as I attached each additional tree. I die cut 14 trees from the Stampin' Up! Card Front Builder Thinlits Dies, but the number you need will be determined by the type and size of element you chose to use on your card.
Next, if you used A2 size paper, you will need to cut a tab to attach the two front panels together. I cut an 1-1/2" x 3" strip of the same cardstock as my card base, and scored in lengthwise down the middle at 3/4", Then I applied a strip of Tear & Tape (super strong tape) close along the score line. Peel off the protective strip from the tape and attach it to the inside edge of the card front, one panel at a time. Make sure to LINE UP the front edges when you press it closed.
The final step was to create the greeting. I stamped the sentiment from the SU Holiday Home stamp set onto a scrap of Whisper White cardstock using Garden Green ink, then punched it out with my SU Word Window Punch. The Real Red mat was punched using an SU Modern Label punch. After gluing the two together, I mounted the sentiment onto the "sky" portion of the card using Adhesive Foam Strips.
I am rating this card as a "5" out of "5" because of all the VERY careful measurements required, and careful placement and adhering of the "stand-up" elements. This card took over an hour to make.
Date: Sunday, November 19, 2017 GMT Views: 667
Favorited:7
Paper: SU Pool Party, All is Calm DSP, Nordic Noel DSP, Whisper White, Real Red
Paper Size: 8-1/2"x 5-1/2"
Ink: SU Garden Green
Accessories: SU Card Front Builder Thinlits Dies, Tombow Multi Liquid Glue, Tear & Tape, Stampin' Trimmer, SU Modern Label Punch, SU Word Window Punch, Score Pal,