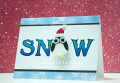
I saw this card on Pinterest, and decided I had to try it myself: https://www.pinterest.com/pin/506303183099839838/. I created my owl from red & white cardstocks. For his belt buckle, I punched a hole in gold foil cardstock with a 1/4" hole punch, and then punched around that with the owl punch, using the circular section for the larger part of the eyes. I used a 2-way glue pen to put all the pieces together, and added googly eyes with Ranger Multi Medium Matte. I also drew in a beak with a gold gel pen. (The black "beak" area just bothered me!) I hand cut a hat and added a felt strip to the brim. For the pompom, I couldn't get a regular pompom to stay glued on. So I die cut a star shape using one section of the "Rounds and Rounds" die from white cardstock. I glued that to white felt, let the glue dry, and then fussy cut the felt, using the cardstock shape as a guide. Finally, I glued that in place.
I didn't have any letter stamps or dies that were large enough, so I found an old Creating Keepsakes font on our computer that would work. I scanned the owl into the computer, and opened it in Photoshop. I used that image on a larger blank canvas to size my letters, and then printed just the letters onto a piece of white cardstock. I colored them with my colored pencils, then added my owl with a Mini Spring action wobbler.
To assemble my card, I cut 2 strips of patterned paper from my scrap stash, and 2 narrow strips of black cardstock. I adhered the black behind my main panel, so that 1/8" peeks out from the top & bottom. I adhered my patterned paper strips to the front of a white card base, and mounted my panel over those. I really love how this card came out!
Date: Friday, November 10, 2017 GMT Views: 436
Favorited:2