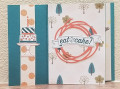
This card was made for Try Stampin -Or Not- On Tuesday sketch challenge #349: http://trystampinontuesday.blogspot.com/ with the optional challenge of "silver bells and shaped easel card.
I had seen a cute lighted easel card on Pinterest (Bonnie Henderson) that I thought could easily be adapted to a Christmas card (since I am on a roll making holiday cards for the upcoming season).
The base of the card is made with Stampin' Up! Night of Navy cardstock cut to 4-1/4" x 11". This piece was scored at 2-3/4" and 5-1/2" to create the easel mechanism. Use your bone folder to make nice sharp folds. The folds are made by first folding in half like a standard portrait-type card, with the second scored section facing up. Fold that smaller scored section back so it meets the top of the folded card. Now unfold it so it's a standard folded card, but with a fold line through the front of the card.
The second piece of Night of Navy was cut 4-1/4"x 5-1/2". It was then laid INSIDE the card base. Lightly glue close to the edges of the 4-1/4"x 5-1/2" piece ONLY ON THE BOTTOM HALF of panel is glued to the back of the card front when it is closed (see picture to help you visualize). THIS IS VERY IMPORTANT since you will need to slide your vellum between the two layers to finish off the card later.
Now, open the card up and place your die centered on the front of the card where the second smaller piece is glued to the back of the card base front. Don't worry, your die will easily cut through two layers of cardstock. Run this through your Big Shot (or whatever die cutting machine you have) using your standard sandwich.
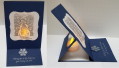
The result is that you now have an opening through your double layers that you can now fold back like an easel as show in the photo.
Now to prepare your vellum. I chose a snowman scene from the retired 2003 Stampin' Up! A Beautiful Season stamp set. Wipe your vellum with an anti-static tool like SU's Embossing Buddy powder bag to prevent stray embossing powder from sticking where you don't want it. Stamp your image onto the vellum using Versamark clear ink, then cover the image with silver embossing powder. Knock off the excess onto a clean piece of scrap paper and return the excess to its container. Now, use your Heat Tool to emboss the powder until it's shiny.
Trim this piece of vellum so that it will fit inside your card's opening you die-cut earlier, making sure that it is a little bit LARGER than the opening. It has to fit between the layers of cardstock, within the limits of where you glued the two pieces together. Just slide it in. Mine took a LOT of fussing to get it fitted in without buckling. I had to trim it just a smidgen smaller a couple times. Don't trim it TOO MUCH, or it won't cover the entire opening you die-cut.
The last two steps were to heat emboss the sentiment (in this case from SU's 2006 Sleigh Full of Toys set) close to the bottom of the inside of the card. Then, create some kind of "stop" that your easel can rest against when it's open. I used an Art-C Snowflake stamp/die combo that was created with heat embossing just like the vellum panel. Mine was attached with a Mini Glue dot toward the lower edge of the snowflake to allow the "stop" to have enough give to be raised off the card. You can also use gems or brads to achieve the same purpose.
All you need to do is add a flame-less votive candle inside the card when the easel is propped open. The warm glow of the candle really makes this card stand out!
I rated this card a difficulty rating of "4" because of the precise measurements and placement of the card elements. Careful gluing around the edges of the smaller panel will save you a heap of sweat!!!
Date: Thursday, November 2, 2017 GMT Views: 1124
Favorited:5