Happy Halloween everyone! :-) It's not often that I start and finish a card in one day but I knew exactly what I wanted to do to make my card and the layout is based on a card that I saw on someone's blog. You can find a link to that card on my blog (see blog link below).
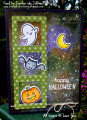
I have been recently playing around with doing Galaxy Distress Ink backgrounds and thought I would try one using Halloween colours ie: orange, green, purple and black - so I chose Carved Pumpkin, Wilted Violet, Twisted Citron and Black Soot. I smooshed the inks onto my craft mat and sprayed them with water then dabbed them onto my Ranger watercolour cardstock with a large round paintbrush. I didn't want to dip the cardstock into the colours as I would normally do because I knew the colours would turn a muddy brown if they mixed too much together. I did several layers and dried each layer off with my heat gun. I used my Ranger round ink blending tool and Black Soot Distress Ink and went over the whole piece then dried it off again with my heat tool. Galaxy backgrounds always look like a hot mess before you add the stars but you just have to keep going and not be tempted to bin it! I spritzed the cardstock with clean water and blotted it up with a paper towel then splattered the cardstock using watered-down white acrylic paint and an old toothbrush then dried the panel off again with my heat-gun.
All the images and the sentiment are from the Lawn Fawn stamp/die set 'Spooktacular'. I stamped the images onto Ranger watercolour cardstock using Ranger Archival Jet Black ink and coloured them with Derwent Inktense pencils and a #2 round paintbrush. I added Clear Wink of Stella to the ghost, fangs on the bat, the eyes and mouth on the pumpkin and the moon - alas, not captured by the camera. The sentiment was stamped using Versamark Watermark ink and heat-set using Stampin' Up White embossing powder. The designer paper for the side panel is by Graphic 45 - Abracadabra from their 'An Eerie Tale Collection' from 2014 and was diecut using a My Favorite Things Stitched Interactive Window Trio die and my Big Shot. Because this die only diecuts 3 sides of the square and the 4th is just a crease line, I trimmed this line with my craft knife. The squares are meant to be like a peek-a-boo window that you open up. I like how the die cuts the stitching detail on the outside of the window for a bit of interest. I rounded the corners of the panel using a 1/8" Corner Chomper.
I tied on the Darice twine then glued the green panel and the moon to my galaxy background using Tombow Mono Multi glue then glued the images inside and just tucked them into the panel as the glue was still wet which made it easy. Lastly, I glued the finished panel to a dark purple card base.
Registered: July 9, 2008 Location: Stars Fell on Alabama Posts: 74653
Fri, Dec 22, 2017 @ 4:29 AM
What a cool Halloween card! That is a fabulous night sky you created and the characters are so cute in the little windows.
------------------------------ My Blog---My Gallery---My PinterestI'm a Punchkateer! (Prez) FOREVERDirty Dozen Alumni2014 CAS Spring DT--- Inspiration Challenge Co- Hostess 12/02/17-12/28/19 Watercolor Wednesday Design Team Hebrews 13:2Brenda
Registered: February 26, 2007 Location: On SCS Posts: 36622
Fri, Dec 22, 2017 @ 9:53 AM
What a delightful card! Your background looks amazing! I can see why it is your favorite!
------------------------------ Kim in Illinois, Dirty Dozen Alum, QFTD#207, FS798, VSN Moderator "Famous Last Words" Spring Virtual Stamp Night, April 19 & 20
Splitcoast Dirty Dozen Alumni Proud Fan Club Member Splitcoast Challenge Hostess Teapot Tuesday TEAm
Registered: April 18, 2011 Location: Melbourne, Aus Posts: 51844
Fri, Dec 22, 2017 @ 12:21 PM
Jocelyn this look amazing! Thanks so much for all the details, it was terrific reading how this came about. I can sure see why it was your favourite for 2017. Merry Christmas.
------------------------------ Susie
Please don't take your organs to heaven - heaven knows we need them here.