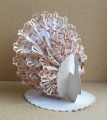
In the past, I'd always made rosettes with 3/8" scores, and did that before carefully re-reading the tutorial for measurements-- Eh! I'd already stamped, sponged and punched them! Well, I used them anyway. I think I prefer the fatter turkey tail.
I also chose to make the turkey white, like most commercially raised turkeys. I cut two turkey heads, with a little extra for a tab in back. I used an oval with a slit for the body, and slid the breast and head construction through the slit, glued it and then glued the oval on the front.
Some copic facial features, and called it done.
tfl
Date: Wednesday, October 11, 2017 GMT Views: 1128
Favorited:3
Registered: October 18, 2015 Location: Cary, NC Posts: 19903
Wed, Oct 11, 2017 @ 12:54 PM
Great looking turkey! Sounds like you have made turkeys before! Love the all white . This was my first paper turkey so I followed the tutorial but next time, I would make it bigger and fatter!
Registered: August 30, 2006 Location: Saugus, Massachusetts Posts: 64911
Wed, Oct 11, 2017 @ 3:05 PM
I love the punch you used for your turkey feathers Brenda - and the natural colors you used - I tried that too - but used the wild turkey as a model for mine! I like the way you made the piece behind the body - will have to try that if I make another one!
------------------------------ Julia Aston Proud member of SCS Fan Club and Dirty Dozen Alumni, former DT member on Color Challenge My Blog