• login
  • join
  • about
  • help
 
  • Home
  • Gallery
  • Forum
  • Tutorials
  • Store Directory
  • Blogs
Splitcoast Gallery
 
Home     Company Galleries     Stampin Up! Galleries     Occasions Galleries     Upload a Card    


In the Gallery

Register

Today's Uploads

Search the gallery

Advanced Search

Around the Site

Join the Fan Club

Join a Group

Member List

Contact Us

Store Directory

Get the Weekly
Inkling
newsletter


Previous Issues

Get Social

Splitcoaststampers on InstagramLike Splitcoaststampers on FacebookFollow Splitcoaststampers on TwitterPit Splitcoaststampers on Pinterest

Sponsored Ads

Home » C-D Stampin' Up! Sets » Dragonfly Dreams
« Previous Image ·> Slide Show ·Next Image »

Lazy Summer Buzz'n
Added to Favorite

Photo Details
Poster: donnaks

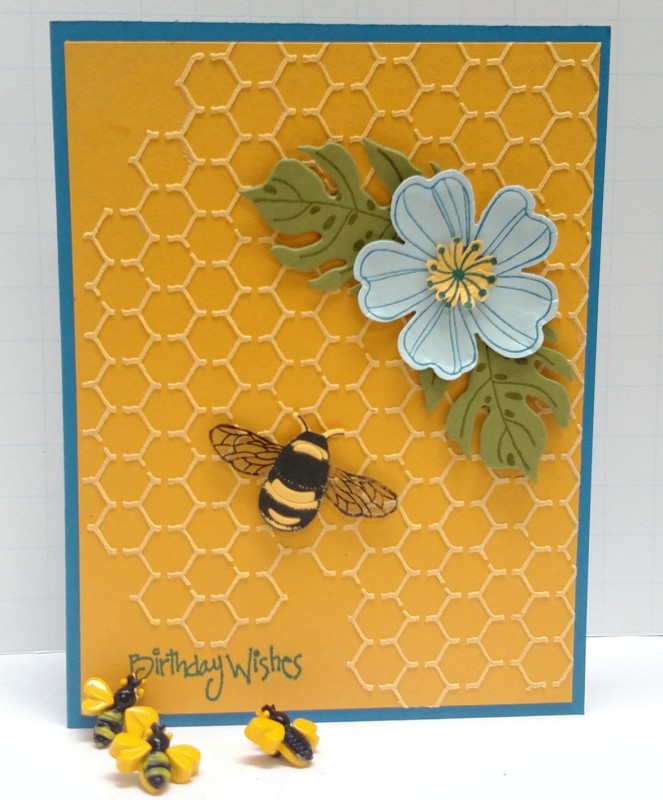
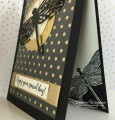
 Made for Try Stamping on Friday Challenge #117 in which the theme was summer, and included the use of the color blue: http://tgifchallenges.blogspot.com/

I started the card by cutting a front panel 4"x 5-1/4" out of Stampin' Up! Crushed Curry cardstock. Using this as my base, I laid the Crafter's Workshop Mini-Chickenwire plastic stencil over it (hinge with a piece of painter's tape), and spread about one tablespoon of embossing paste over it that I had tinted with two drops of SU Daffodil Delight re-inker ink. Make sure the layer is thin and level. I set this aside to dry while I worked on the rest of the card elements.

The bee was created by stamping the bee from the SU Dragonfly Dreams stamp set using Memento Tuxedo Black ink onto SU Daffodil Delight cardstock. I then cut this out with the bee die from the SU Detailed Dragonfly Thinlits die set. Don't worry if the cut isn't super acurate, because the next step is to use the same die and cut a plain piece of Daffodil Delight. Carefully removed the three pieces of yellow cutouts that match the holes in the bee's body you cut out of the black stamped image. Place glue dots on the BACK side of the stamped bee, and carefully remove the three yellow pieces of plain yellow that match the holes. Insert these three yellow pieces into the bee's body so they stick to the glue dots showing through the holes.

Next, using Stazon Onyx Black ink, stamp the bee image onto clear acetate. Let it dry for a while so your fingers don't smoosh the ink (Stazon takes a while to dry). When they are dry, cut them out using paper snips so that there is a saddle/bridge between the two wings holding them together. Then, cut the stamped wings off the stamped bee, and attach the acetate wings to the back of the bee in place of the stamped ones you had cut off. Now you have a bee with realistic transparent wings!

Using my MISTI, I stamped the birthday greeting in the bottom left corner of the stamp where the stencil hadn't created the honeycomb pattern. If you use a different stencil, make sure that you don't put embossing paste where you plan to stamp your sentiment.

I then stamped and punched out the blue flower (Pacific Point ink on Soft Sky cardstock). The leaves were stamped using the SU Botanical Blooms set with Old Olive ink. They were then die-cut using the matching die fro the SU Botanical Builder Framelits Dies. The center yellow "stamen" on the flower was stamped with Pacific Point onto Daffodil Delight cardstock. It was then punched out with a 1/2" punch, and hand trimmed using paper snips to separate the stamen. Both the flower and stamen were pressed using a bone folder on top of a rubber mouse pad to create depth to the flower.

The assembled flower and two leaves were attached to the front panel using Mini Glue Dots. The bee was attached using Adhesive Foam Strips to give the bee "height".

Finally, the completed front panel was glued to the card base using Tombow Multi Liquid Glue.

I rated this card as difficulty "4" because of the many steps it took for the bee, and time it took for the Stazon ink and embossing paste to dry. But don't be afraid to try a similar card... with the instructions I've provided, it shouldn't take long.

Date: Saturday, July 22, 2017 GMT
Views: 1622
Favorited: 8
Additional Info
Keywords: TCIFC117
Stamps: SU Dragonfly Dreams, Flower Shop, Botanical Blooms, Printworks Make a Wish
Paper: SU Pacific Point, Crushed Curry, Soft Sky, Old Olive, Daffodil Delight
Paper Size: A2
Ink: Stazon Onyx Black, Memento Tuxedo Black, SU Pacific Point, Old Olive, Daffodil Delight
Accessories: Crafter's Workshop Mini-Chickenwire Stencil, SU Detailed Dragonfly Thinlits Dies, SU Botanical Builder Framelits Dies, 1/2" Circle Punch, Pansy Punch, Clear Acetate, Mini Glue Dots, Texture Paste, Paper Snips, Tombow Multi Liquid Glue, MISTI, Bone Folder
Techniques: Colored Texture Paste, Die Cutting
Difficulty (1-Easy 5-Advanced): 4

IMG_8008_b
«
CTS231_Dra
«
TGIFC117_-
DragonFlyD
»
DragonflyD
»

Author
Thread Post A Reply 
Muvs


Watercolor Wizard


Registered: August 9, 2011
Location:
Posts: 8432
Sat, Jul 22, 2017 @ 5:46 PM

Beautiful card - TFS!

------------------------------
This user is offline
Click here to see this users profile Click here to Send this user a Private Message Find more posts by this user Visit this user's gallery Report Post
Jay_Bee


Splitcoast Dirty Dozen Alumni


Registered: July 22, 2007
Location: Carshalton, Surrey. UK
Posts: 81665
Sun, Jul 23, 2017 @ 1:59 AM

Lovely card - lots of patience for that bee and waiting for your paste to dry - pretty

------------------------------
Janine (aka Jay_Bee) Find a few favourites and share some love - check out the Favorites Forum Dirty Dozen Alumni
This user is online
Click here to see this users profile Click here to Send this user a Private Message Find more posts by this user Visit this user's gallery Report Post
rockybloky


Compulsive Stamper


Registered: April 11, 2011
Location: Melbourne, Australia
Posts: 34
Mon, Jul 24, 2017 @ 3:10 AM

I love that Chickenwire stencil background Donna. It makes for the perfect 'honeycomb' with the gorgeous bee embellishment. Such a fun and summery card. Thanks for playing along and supporting us this week at TGIF Challenges. Rochelle xo

------------------------------
This user is offline
Click here to see this users profile Click here to Send this user a Private Message Find more posts by this user Visit this user's gallery Report Post
carolynn_sander


Matboard Maniac


Registered: April 15, 2005
Location: Calgary, AB
Posts: 246
Thu, Jul 27, 2017 @ 9:35 AM

What a lovely card! & That bee is super duper sweet! Thank you so much for sharing your card with us this week over at TGIF Challenges! 💖

------------------------------
This user is offline
Click here to see this users profile Click here to Send this user a Private Message Find more posts by this user Visit this user's gallery Report Post


Switch to full site

home |  gallery |  forums |  resources |  news |  store directory  |   about
contact us  |   calendar   |  advertise

Visit our platinum partners:
My Sweet Petunia   |  Verve  |   The Cat‘s Pajamas

© 2013-2026 MH Sub I, LLC dba Internet Brands.

Use of this Web site constitutes acceptance of the Splitcoaststampers.com

Terms of Use, Rules, Privacy Policy, and Cookie Policy.

Manage Preferences Your Privacy Choices


donnaks
View Public Profile
Send a private message to donnaks
Send email to donnaks
Visit donnaks's Gallery
Find More Posts by donnaks
Add donnaks to Your Buddy List
Muvs
View Public Profile
Send a private message to Muvs
Send email to Muvs
Visit Muvs's Gallery
Find More Posts by Muvs
Add Muvs to Your Buddy List
Jay_Bee
View Public Profile
Send a private message to Jay_Bee
Send email to Jay_Bee
Visit Jay_Bee's Gallery
Find More Posts by Jay_Bee
Add Jay_Bee to Your Buddy List
rockybloky
View Public Profile
Send a private message to rockybloky
Send email to rockybloky
Visit rockybloky's homepage!
Visit rockybloky's Gallery
Find More Posts by rockybloky
Add rockybloky to Your Buddy List
carolynn_sander
View Public Profile
Send a private message to carolynn_sander
Send email to carolynn_sander
Visit carolynn_sander's Gallery
Find More Posts by carolynn_sander
Add carolynn_sander to Your Buddy List