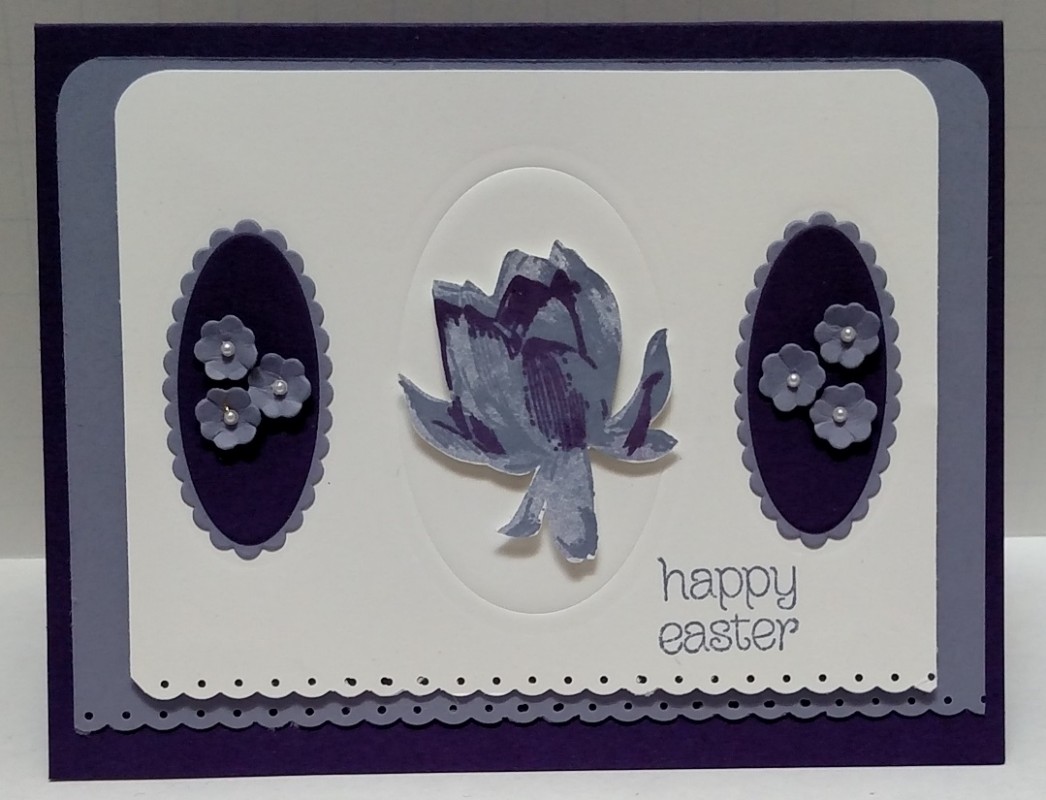
Made as a Design Team card for Try Stampin -Or Not- On Tuesday Sketch Challenged #313: http://trystampinontuesday.blogspot.com/ with an optional theme of "Beautiful Flowers".
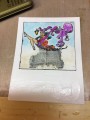
The center oval impression surrounding the lotus blossom was created by using the second to smallest SU Layering Ovals Framelit Die on the BACK side of the Whisper White cardstock panel. This was run through the Big Shot with a Spellbinders Rubber Impressions Mat between the cardstock and the bottom clear plate. The rubber mat prevents the die from cutting into the cardstock, instead, it leaves an inpression.
The two vertical ovals were cut from the smallest oval and scallop dies in this same set of framelits. They were then glued down on either side of the main impression panel.
The central flower is from the SU Lotus Blossom Stamp Set. It is a multi-step stamping flower where the largest stamp was inked with Wisteria Wonder, then stamped off on a scratch paper before stamping onto a piece of Whisper White. Next, the next step stamp was inked with Wisteria Wonder and stamped directly on top of the first stamped image. Finally, the smallest stamp was inked with Elegant Eggplant and aligned and stamped on top of the previous two. The resulting flower was fussy-cut and mounted in the center of the oval impression using Adhesive Foam Strips.
The cluster of three small flowers on either side of the Lotus Blossom were die cut from Wisteria Wonder cardstock using the smallest blossom die from the SU Flower Fair Framelits set. Each was "cupped" on a rubber mat using the handle end of an SU Paper Piercer. A small pearl was centered in each blossom. The blossoms were attached using Mini Glue Dots.
The bottom of the white front panel was scalloped using an EK Tools Dotted Scallop Edge Punch. The top two corners of the white panel were rounded using a Corner Rounder Punch.
The "Happy Easter" sentiment was stamped at the bottom of the white panel using a greeting from the SU "Circle of Spring" photopolymer stamp set.
Finally, the Wisteria Wonder matting beneath the main Whisper White panel was also punched with dotted scallops at the bottom, and it's upper two corners were rounded.
All layers were glued together using Tombow Multi Liquid Glue, and mounted onto the Elegant Eggplant card base.
The card evolved as I created it, since I wanted to using oval impressions for the two side elements as well. But, the ovals just didn't show up well enough, and had a tendency to crinkle to the nearby edges of the white cardstock when run through the Big Shot.
I like how it turned out, given the sketch we were challenged to use. It made me stretch outside my normal card-making comfort zone.
I rated it as a difficulty "4" level because of all the different tools I needed to create it. It took me about an hour to complete it, but if I did it a second time I estimate it would take 20 minutes since I wouldn't have to experiment so much.
Date: Sunday, February 12, 2017 GMT Views: 849
Favorited:2