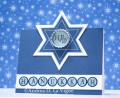
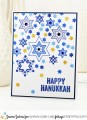
I actually created 2 of this design to send to Send a Smile 4 Kids. I got the design inspiration from Pinterest. I created a Star of David template in Photoshop, and traced it onto a piece of stencil plastic. I cut that out & used it to trace & cut out the dark blue star. I cut out a slightly larger star from light blue cardstock, and stitched the 2 together with my sewing machine. Finally, I cut the largest star from silver mirror cardstock, and adhered the blue star to that. I created the letters in Photoshop. I sized & arranged the letters for the "Happy" to fit on a 1" circle, and sized the rest for a 1/2" circle each. I printed those onto a light blue cardstock, and punched them out. I glued my largest circle in the inside center of a silver bottle cap, and used Perfect Paper Adhesive to glue that to my Star of David. I punched 5/8" circles from dark blue cardstock, and glued my letter tiles on top. I backed them with a strip of silver to help them stand out. After adhering everything to a dark blue A2 card front panel, I mounted that to a white card base. I added a coat of Crystal Laquer to the letters & "Happy" circle, and let that dry for several hours.
Date: Wednesday, November 9, 2016 GMT Views: 731
Favorited:2