Important note for non-Americans: if you use the day/ month format, remember to adjust the way you add the stacks of numbers to adapt for that! Thanks for pointing that out, Susie. I made this with an American pen-friend in mind, never thought about how confusing it would be if I tried using it myself!
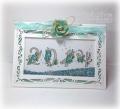
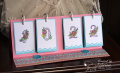
I made this as a sample for the Easel Perpetual Calendar tutorial. It was really easy to follow, just make sure to pay attention to how many of each number to stamp! I stamped mine on white card and coloured them with pencils adding a few glittery highlights, then punched the bottom edge and layered them onto pale blue card.
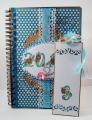
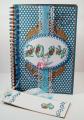
After that I punched them all, making a little template to use as I could punch several at a time with the Crop-a-Dile. Because I substituted plastic rings from my sewing box for the jump rings the tutorial calls for, I had to make my punched holes a little bit larger - I used the smaller one on the Crop-a-Dile. Then I created the base and added the calendar numbers.
To decorate the base I was lucky to find a strip of decorative stickers from the BG Kyoshi set - I had predicated my colouring on using a strip of the DP to decorate the easel, only to discover that I had nothing left long enough to use! The blue buttons were made with an MFT die, about 3 or 4 layered together, with Glossy Accents on top and a little sprinkling of glitter.
Date: Wednesday, October 19, 2016 GMT Views: 580
Favorited:4
Splitcoast Dirty Dozen Alumni Proud Fan Club Member Splitcoast Challenge Hostess Teapot Tuesday TEAm
Registered: April 18, 2011 Location: Melbourne, Aus Posts: 51844
Fri, Oct 21, 2016 @ 3:49 AM
Oh wow Sabrina, how good is this! Now I am curious, I will have to google how you show the date. I thought you would be the same as us, the day first followed by month. I digress, your calendar looks very pretty!
------------------------------ Susie
Please don't take your organs to heaven - heaven knows we need them here.