Heartfelt Creations Products and Products Carried in Their Shop:
HCDP1-271 Blushing Rose Paper Collection
HCPC 3755 Blushing Rose Stem Cling Stamps
HCD1-7113 Blushing Rose Stem Die
HCPC-3758 Encourage You Cling Stamps
HCD1-7114 Blushing Rose Swirls Die
HCPC-3752 Classic Rose Cling Stamps
HCD1-7110 Classic Rose Die
Lettuce Entertain You Prills
HCST1-401 Deluxe Flower Shaping Kit
Memento Ink: Dandelion, New Sprout, Bamboo Leaves, Tuxedo Black
Designer Dries Clear Glue
Guacamole Colorbox Chalk Ink
Other Supplies: Squeezed Lemonade Distress Ink, Canson Watercolor Paper, Cream Cardstock, Rich Cocoa Memento Ink, Lemon Pro Marker, 6mm Half Pearls, White Seam Binding, White Flower Stamen, Sticky Doos, Hot Glue Gun, Creative Embellishments Circle Bokeh Stencil. Modeling Paste
Instructions:
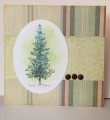
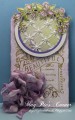
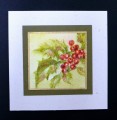
My card is 5 1/2 X 5 1/2. Make card base using the cream cardstock and cover with a piece of the paper collection. I dampened the edges and then distressed the edges before I adhered to the card front. Next I used the circle stencil and applied modeling paste to the front of the card. I sprinkled glitter over the wet paste and set it aside to dry. Stamp, cut out, color and then shape the flowers, rosebuds, and the leaves. The smaller flowers have Prills in the center that are glued down. Next I stamped and cut out the sentiment. I used white half pearls and colored them with the Pro Marker, then I glued them to the edges of the sentiment. I also colored the white flower stamen to match the pearls. I dyed the seam binding to match the roses and tied a bow. Now it is time to begin to add the flowers, leaves and the bow to your card front. Once I had decided where I wanted everything, I used the hot glue gun to glue things down. The sentiment was popped up with Sticky Doos to add some dimension to the front of my card.
Date: Wednesday, October 12, 2016 GMT Views: 250
Favorited:2