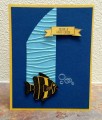
The front panel (Night of Navy) was die cut using the Swirly Scribbles "wave" on alternate corners. A hole into which I would later fit the buoy was die cut in the exact center of the panel. The "wave" die was used again to cut Marina Mist cardstock, and the "extra" pieces of this lighter blue were fitted into the darker blue diecut waves using Tombow glue. Then cut your square sides of the front panel AFTER you've assembled and glued down your pieces (to ensure tidy sides).
The optional theme was "Anchors Away" so I used the anchor stamp from "The Open Sea" to create embellishments. I stamped the anchor twice on furnace tape (NOT duct tape) that I had adhered to heavy cardstock using Stazon Jet Black ink. The anchors were fussy cut and mounted using foam adhesive strips.
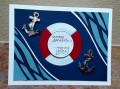
The red and white circles were stacked and diecut and then quartered using my trimmer at the same time to ensure they would fit together when assembled in the circle hole at the center of the front panel. Note that I LIGHTLY sponged Marina Mist ink on the inside and outside edges of the buoy BEFORE gluing them down to give the buoy a more rounded look. The sentiment was mounted with foam strips in the center of the buoy.
The assembled and trimmed front panel was then glued onto the Whisper White thick cardstock to finish off the card.
NOTE: On THIS card I used Whisper White cardstock as my base instead of Night of Navy upon which I assembled on the paper pieces. That allowed me to create the slim white edge between the waves and the center piece of the panel, BUT I had to use a super tiny ink dauber to color all the inside edges where I was piecing the light blue so that the white didn't show around the edges. The instructions I shared above advises you to use Night of Navy to avoid this tedious fix.
Date: Tuesday, July 19, 2016 GMT Views: 1348
Favorited:2