I will do my best to try and explain some of how I did this. To be honest, a lot of this was trial and error. When I do cards like this I start with a picture of the image I'm trying to create, and continually reference it.
This card too me 7 hours straight! I'm exhausted. LOL.
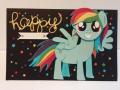
Well, I started with the head and went from there. The Head is the 2" circle punch. For the Eyes I used the Small and Large oval punches. The white base is the small oval. Then I punched a large oval, using the small oval to cut a smaller piece out, and so on. I used paper snips to trim them down. Similar technique with whites of the eyes and reflection, used one punch then another to punch a smaller shape, and trimmed with scissors. Added white gel pen along the Rose Red layer to accent.
Sometimes Scissors are the only way to get what you want, even if it looks slightly uneven.
Same punching technique for the mouth and ears. I used a turquoise marker for ALL the accents seen along the body and face. I drew the lines, coated the edges of the mouth and ears, drew the nose, etc.
Once you start on the hair, your first piece is important, the rest is just layering upon layers. I started with the sweetheart punch and gumball green. The pointed end of the green tucked behind the ear is the base of the heart. I then trimmed from the inside to create hair layers. Then, after that first piece I took scraps of the other colors, layering, gluing, and trimming. Once I got the one piece put together, I glued that entire layer to tempting turquoise, to give it that line around the edge (and it helps keep the pieces together).
The body is an oval from the framelits, then just trimming to get to the desire shape. Legs were just strips I cut down and shaped the way I needed them. The inside legs are sponged with turquoise to give the shadow. Used the Turquoise marker again to add highlights around the edges of the body and legs, to draw accents along the legs to help give it dimension.
The "Cutie Mark" (my 9 year old informs me it is called) was hand drawn. The wing covers it slightly, which is unfortunate but couldn't be helped.
Tail done in a similar fashion to the mane, just paper snips.
The wings were the biggest challenge. To be honest, if I could redo any part it would be that. I couldn't draw the shape for the life of me. I tried to use a flower from the Flower Fair framelits to create a base I could alter. That helped but it still isn't perfect. But I spend a long while trying to get the wings down and finally got them as close as I could to be acceptable.
And that's pretty much it! Just lots of busy work and tweaking. I glued all the confetti stars individually. A pain in the bum, but totally worth the look.
I hope the description helps! I love how this turned out, it's part of a gift to my friend. Have a great weekend!
Date: Saturday, March 14, 2015 GMT Views: 1747
Favorited:15
Paper: Pool Party, Basic Black, Whisper White, Rose Red (for eyes) Real Red, Tangerine Tango, Daffodil Delight, Gumball Green, Tempting Turquoise, Elegant Eggplant, Gold Foil Paper
Paper Size: 5 1/2 x 8 1/2
Ink: Daffodil Delight, Tempting Turquoise, Real Red
Accessories: Hello You Thinlits, Bitty Batter Framelits, White Gel Pen, Star Confetti Punch, Punches: 2" Circle, 3/4" Circle, 1/2" circle, Small and Large Ovals, Sweetheart, Framelits: Hearts, Ovals, Flower Fair
Registered: January 4, 2012 Location: Twin Cities, MN Posts: 864
Sat, Mar 14, 2015 @ 4:09 PM
Excuse me while I pick up my jaw from the floor! This is an incredible work of punch art, and I can see why it took you hours! Reminds me of my childhood My Little Ponies, and brings back fond memories! Awesome work!